Showing posts with label olive oil. Show all posts

Sunday, February 20, 2011

The Beet goes on - Beet, Orange, and Red Onion Salad

I've grown more fond of beets as time goes on. From the oven roasted tiny jewels from last summer, to the Beet Ginger relish, I love the earthy flavor and beautiful colors.

This next one is adapted from the Financial Times food columnist Rowley Leigh January 14, 2011 article "Acid Beets"

I've left out a few things he included, namely mint and black olives, but it is still delicious. This elegant salad is simple as can be.


Ingredients:
Beets
Oranges
Red Onion
Olive oil
Red wine vinegar
Salt and pepper


Steam the beets until tender, then peel and cut into slice about 1/4" thick


Put the beets in a bowl, add a pinch of salt and and a splash of the vinegar. Toss  very gently.

Cut the ends off the oranges and cut the peels of lengthwise. Slice peeled oranges about as thick as the beets.


Next, slice the red onions into thin rings. I used a mandolin instead of a knife.


Assemble the salad by putting down a layer of sliced beets. followed by a layer of orange slices topped by a pinch of salt, grind of black pepper, dash of vinegar and dribble of olive oil. Add a layer of the sliced onions.

Repeat.

Top with a little more olive oil if you choose.


Enjoy! Sweet, tangy, earthy, tender and crunchy, this salad has great flavor and textural contrasts. Plus, once the beets are cooked, it's ready in about 10 minutes.  Try it as a sophisticated starter, or with some crusty bread as a light meal.

Until next time, Eat Well & Keep Digging!

The Gastronomic Gardener
Garden blog http://amidwestgarden.blogspot.com/
Cooking blog http://ihopeyouarehungry.blogspot.com/
Twitter - www.twitter.com/DavidPOffutt
http://www.facebook.com/TheGastronomicGardener

Sunday, November 28, 2010

Fried chickpeas with chorizo and spinach

Straight from the New York Times' (Wed Feb 24 2010) Mark Bittman (I am a fan), this simple dish was perfect on a cold night. The chorizo is the cured  & dried Spanish kind, not the loose fresh Mexican kind. Frying the chick peas gives them has a nice crunch they normally don't have.

Ingredients:
1/4 cup olive oil, plus a little extra for drizzling
2 cups cooked chickpeas, as dry as possible (use paper towels or a dish towel to blot them dry)
Salt and pepper to taste
4 oz dried chorizo diced
1/2 lb spinach
1/4 cup Sherry (I skipped this)
1 to 2 cups bread crumbs


Heat the broiler

Add 3 tbs olive oil to skillet big enough to hold beans in a single layer over medium high heat. When oil is hot, add chickpeas, salt and pepper.


Reduce heat to medium  and cook, shaking pan to brown chickpeas, - about 10 minutes. The beans will get a nice color.


Add chorizo and cook another 5-8 minutes,


until the chorizo gives up some color and starts to crisp.


Remove chickpeas and chorizo to a bowl


Add remaining oil to the pan, when hot add the spinach, season with salt and pepper,


Cook over medium low heat until spinach is very soft and almost all liquid has evaporated. This will cook very quickly.


Add chickpeas and chorizo back to pan, toss to combine.


Add bread crumbs and drizzle with olive oil.


Put pan under broiler to lightly brown the top.


 Serve hot or room temperature.


This the the second time I've made this. It is surprisingly filling and delicious!

Until next time, Eat Well & Keep Digging!

The Gastronomic Gardener
Garden blog http://amidwestgarden.blogspot.com/
Cooking blog http://ihopeyouarehungry.blogspot.com/
Twitter - www.twitter.com/DavidPOffutt

Monday, October 25, 2010

Oven Roasted Beets

Back in late August we put in some radishes and beets. The radishes have all been harvested and eaten, and I have a few beets waiting to be roasted.  Simple is best.

Preheat oven to 350F.

Beets, salt & pepper, a splash of olive oil. wrap it up and put into hot oven.


50 Minutes later...


Slice them in half, slip them out of their jackets. Plate. Olive Oil. A grind of pepper.


Serve and enjoy. Simple, but oh so good!

Until Next Time, Eat Well & Keep Digging!

The Gastronomic Gardener
Garden blog http://amidwestgarden.blogspot.com/
Cooking blog http://ihopeyouarehungry.blogspot.com/
Twitter - www.twitter.com/DavidPOffutt
http://www.facebook.com/TheGastronomicGardener

Saturday, October 16, 2010

Freezer Soup

We're busy on this beautiful day and needed a quick lunch. When in doubt I often turn to freezer soup.

This is not a glamorous soup, but it is a great way to practice a little frugality while serving something satisfying.

I believe it is closer to the origin of soup than lobster bisque (no matter how delicious that is!) will ever be. It starts with discipline, just freeze and save the edible scraps from your leftovers. Vegetables, pasta, rice are all perfect. Also small amounts of meat, cooked sausage or ground beef can go into the bucket. I store mine in a quart plastic container in the freezer. When it is full, I make soup. You may add any small amounts of vegetables or green that might be in the fridge, or really whatever you want!

Ingredients
1 qt chicken, beef or vegetable stock
1 small onion diced
1 clove garlic minced
1 tbs oil
Frozen “Bucket of leftovers”
Anything else you might have on hand, today I had a half a bag of baby spinach.
Salt and pepper to taste

Directions
Add oil to a soup pot over medium heat
Add onions and cook until softened, stirring often – about 10 minutes
Add garlic and cook stirring often 3 minutes
Increase heat to medium high
Add Stock and Leftovers
Bring to a boil, reduce heat and simmer for 10 minutes

Taste test and season with salt and pepper.

Enjoy!


Until Next Time, Eat Well & Keep Digging!


The Gastronomic Gardener
Garden blog http://amidwestgarden.blogspot.com/
Cooking blog http://ihopeyouarehungry.blogspot.com/
Twitter - www.twitter.com/DavidPOffutt
http://www.facebook.com/TheGastronomicGardener

Sunday, September 19, 2010

Eggplant stuffed tomatoes

A reader send me a recipe for zucchini  stuffed tomatoes. Well, with today's harvest, I decided to take that recipe and give it a twist to make use of what I had on hand.

Ingredients:
2 Japanese eggplants medium dice
1 small onion diced
1/2 cup diced mushrooms
7 tomatoes,
4 cloves garlic finely diced
1 tsp Herbs De Provence
2 tsp olive oil + more for drizzling
1/2 cup bread crumbs
1/2 cup grated Parmesan (I know the picture shows mozzarella, but I changed my mind at the last minute.
salt and pepper to taste


Directions:
Preheat oven to 350F
Heat olive oil over medium heat. Add garlic and onions.


Cook until onions are soft, stirring often.


Add eggplant and mushrooms and a pinch of salt and grind of pepper.


Cook over medium heat until eggplant browns stirring often. Add herbs.


While eggplant cooks, cut top third of tomatoes off and remove veins, seeds and pulp. Repeat with the rest of the tomatoes.


Add half the Parmesan and bread crumbs to the eggplant mixture, stir to mix.


Stuff the tomato shells with the eggplant mixture.

Mix the remaining bread crumbs and cheese. Sprinkle over the top of each stuffed tomato. Drizzle each with a little olive oil.


Put in preheated oven for 30 minutes.

After 30 minutes, change oven to broil, and broil for 3-5 minutes until tops are browned.


Enjoy!


The Gastronomic Gardener
Garden blog http://amidwestgarden.blogspot.com/
Cooking blog http://ihopeyouarehungry.blogspot.com/
Twitter - www.twitter.com/DavidPOffutt
http://www.facebook.com/TheGastronomicGardener

Tuesday, September 14, 2010

Garlic Anchovy Pasta

Some of you may have strong negative reactions to anchovies. If so, skip this post.

Otherwise read on!

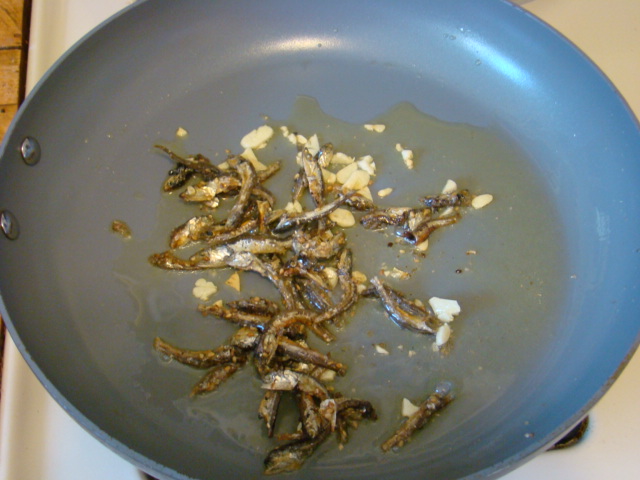
While at the Korean Market they had a big tasting table set up and one of the items was stir fried anchovies. Heads and all! They were like fish jerky. A bit sweet and chewy, with garlic and sesame. I liked them!

I'm home today nursing a heavy chest cold but still feeling a bit peckish.

A fast brunch of pasta, the anchovies and garlic seemed like a fine idea!


Put the pasta on to boil.


Put some oil, the garlic and anchovies in a pan.


Add a few spoonfuls of the pasta water to help steam the dried fish. Drain the pasta and add to the pan.


A quick toss, a sprinkle of chives


Plate it up and dig in!


The fish is chewy, sweet and nutty. A perfect light meal!

I'm headed back to the couch to try and beat this cold.

Until next time,

Eat Well & Keep Digging!

The Gastronomic Gardener
Garden blog http://amidwestgarden.blogspot.com/
Cooking blog http://ihopeyouarehungry.blogspot.com/
Twitter - www.twitter.com/DavidPOffutt
http://www.facebook.com/TheGastronomicGardener

Sunday, September 12, 2010

Grilled Baby Octopus

After a shopping spree to Super H Mart - (which it turns out has been there for years, I've just been uninformed) I have some frozen baby octopus that I want to make in two styles- Basque and Greek.

Ingredients
baby octopus -  I had 16

For poaching liquid
4 cups water
1.5 cups white wine
.25 cups lemon juice.

Marinade
3/4 cup olive oil
1/3 cup balsamic
3 cloves garlic roughly chopped
splash of lemon juice

Greek style
Olive oil and lemon

Basque style
Boiled new potatoes - sliced into rounds
Sweet paprika
olive oil.


Thaw, rinse and drain octopus.


Add poaching liquids in a pot, add octopuses and bring to a gentle boil. Simmer for 45 minutes-hour while poaching, combine marinade ingredients in big seal top bag.

Drain and cool octopus, add to marinade in bag.


Put in refrigerator for at least 4 hours, overnight works too.

Prepare charcoal grill (you can use gas but it won't have the same flavor)


Drain and place octopuses in grilling basket.

Grill over high heat for minutes until crispy and there is some char on them.


Remove from heat and basket.


To serve

Greek style
Halve octopus
Drizzle with  olive oil and lemon juice.


Basque Style
Arrange sliced potatoes on plate
Rough chop the octopus, put on potatoes sprinkle with sweet paprika, drizzle with olive oil.


They both were good. The Basque style is  a little darker in flavor as would be expected from the smoked paprika. The Greek style was a little brighter flavor; perfect for a summer day.

Personally, I preferred the Basque style. Damn fine!


Until next time Eat Well & Keep Digging!

The Gastronomic Gardener
Garden blog http://amidwestgarden.blogspot.com/
Cooking blog http://ihopeyouarehungry.blogspot.com/
Twitter - www.twitter.com/DavidPOffutt
http://www.facebook.com/TheGastronomicGardener
Related Posts Plugin for WordPress, Blogger...