Friday, January 14, 2011

Prosciutto & Balsamic Carmelized Onion Pizza

I've got one more duck breast prosciutto, and it being Friday night, it is time for pizza. A bit of a rough commute, train issues both morning and night. Thirty minutes late this morning, and  an hour tonight. I want a treat.


A combination of salty duck breast prosciutto, sweet balsamic glazed onions, creamy mozzarella and crisp crust sounds just fine.


Preheat oven with pizza stone to 450F.

A lttle olive oil in the pan, add the onions and  cook over medium heat until they are limp and browning but not crispy.


Add a splash of balsamic vinegar, keep cooking.


Put a generous coating of corn meal on the peel.


Roll out some dough from this recipe.


Add a sprinkle of parmesan, then the mozzarella and onions.


Finally, add some of the prosciutto.


Into the oven for 8 minutes before checking, keep an eye on it until cheese is browned and bubbly and the crust is golden brown. Remove from oven onto cooling rack until cheese sets up. Slice and enjoy!


It was just as I hoped! Sweet, salty crunchy delicious!


Until next time, Eat Well & Keep Digging!


The Gastronomic Gardener
Garden blog http://amidwestgarden.blogspot.com/
Cooking blog http://ihopeyouarehungry.blogspot.com/
Twitter - www.twitter.com/DavidPOffutt

Thursday, January 13, 2011

Kielbasa Dinner

I made some smoked Kielbasa a little while ago; it has been in the freezer until now.

I put it in a pan in a 350F oven with a little water to bring it up to 160F.

Meanwhile I microwaved (gasp!) a couple potatoes, sliced them.


I browned off some lardons from the bacon I made. I just wanted to render some of the fat to cook the potatoes. 


Fry up the potatoes, steam some green beans, and plate, along with the homemade mustard.

Plate it up, and enjoy! The sausage  has a nice snap to it, (though the wife isn't fond of that attribute) and good flavor. Sausage and potatoes - a pretty traditional supper.


Until next time, Eat Well & Keep Digging!


The Gastronomic Gardener
Garden blog http://amidwestgarden.blogspot.com/
Cooking blog http://ihopeyouarehungry.blogspot.com/
Twitter - www.twitter.com/DavidPOffutt
http://www.facebook.com/TheGastronomicGardener

Sunday, January 9, 2011

Pumpkin Ravioli with Sage Butter Sauce

I've made this before but not for a few years. A perfect meatless dinner!

There are many of recipes for this on the Internet and in cookbooks. Look a few up and make it your own.

You can make your own pasta if you are so inclined, but the general availability of wonton wrappers makes this unnecessary unless you want bragging rights.

For the filling:
2 cups pumpkin puree (we had some in the freezer left over from the wife's pie making at Thanksgiving)
1/2 cup cottage cheese drained in cheese cloth (squeeze the liquid out, you could also use Ricotta)
1/2 cup finely minced onion
1 clove garlic finely minced
2 Tbs grated Parmesan
1/2 tsp ground sage
pinch freshly ground nutmeg
2 Tbs butter

For the ravioli - Wonton wrappers

For the sauce
4 tbs butter
Fresh whole sage leaves.


Grate the Parmesan, nutmeg, and add the ground sage.


Melt 2 Tbs butter in a sauce pan over medium heat.


Add the onion and the garlic. Cook, stirring often until soft and fragrant. You don't want to brown it.


Add the pumpkin. Reduce heat to medium low & cook gently. I'm trying to drive off some of the moisture.


I ended up adding another chunk of pumpkin (this brought it up to about 2 cups as listed above).

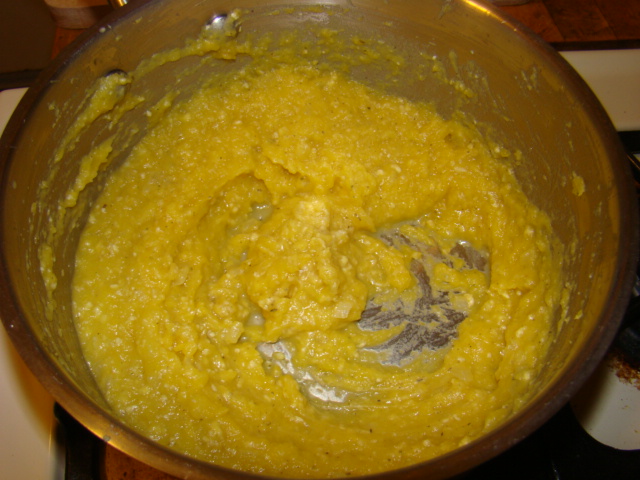
When thick, add Parmesan, sage and nutmeg. Stir to combine. Add the cheese.


Continue cooking until the cheese is incorporated.


I'm looking for a mashed potato consistency.

It goes into a bowl to chill. I like this time of year as we can just pop things out on the porch.

Prep the wanton wrappers.  Brush some water around the edges. You can see that on the far wrappers.


Add a scant tablespoon of filling in the middle. This picture really is too much filling. Use less.


Fold in half and crimp the edges with a fork.  It is easiest to pick them up to fold them in half. Keep working. It takes time but is worth it. This is about a third of them. The rest go out on the porch to freeze


Bring a big pot of salted water to the boil.

For the sauce, melt some butter (4 tbs).


Melt over medium heat. Add the sage leaves.


Remove leaves to a paper towel to drain. Continue cooking butter until light brown.


Reduce heat under the water so it is not a rolling boil. The ravioli are fragile.

Add ravioli to the pot. Cook for 4-6 minutes, until pasta is tender.


Add to the browned butter. Toss very gently to coat.

Plate and garnish with sage leaves.


For the amount of butter, it is really pretty light (well, I'll try to convince myself of that).

The pasta and filling are light and savory. The filling was surprisingly sweet since there is no sugar added. Must just be the pumpkin.  If you have the time, give this a try.


Until next time, Eat Well & Keep digging!


The Gastronomic Gardener
Garden blog http://amidwestgarden.blogspot.com/
Cooking blog http://ihopeyouarehungry.blogspot.com/
Twitter - www.twitter.com/DavidPOffutt

Rye Crackers

Crackers seem to be one of those things we take for granted. They are very inexpensive so why bother to make them yourself? For fun? For the knowledge that you can? As an easy Sunday morning project while the rye bread is on its final rise? Yes! This recipe came off the package of  Bob's Red Mill Dark Rye Flour.

Ingredients:
1/2 cup unbleached flour
1/2 cup rye flour
1/2 tsp salt
1 Tbs Turbinado Sugar (I used light brown)
1 tsp baking powder
2 tsp Caraway seeds
4 Tbs margarine (I used butter)
3 Tbs milk


Preheat oven to 400F.
Mix together dry ingredients.


Cut cold butter into dry ingredients. This is similar to making a pie or pastry crust. If I do this again, I'll do it in the food processor and add the seeds at the last part so as not to crush them. As it was, I used a fork. It took between 5-10 minutes.


Anyway, cut the butter in with a fork until the butter pieces are small and mixture is consistancy of course sand.

Mix in the milk and stir.


Form into a ball and rollout to 1/8" to 1/16" between sheets of waxed paper. The dough will be very sticky.


Cut into desired shape, prick with a fork and transfer to an ungreased cookie sheet. Not the best job I've ever done.


Bake at 400F for 5-6 minutes until light brown on the edges. In reality, I broke up the crackers and let them go a little longer, probably 8-9 minutes total.


Cool on a wire rack. Store in an airtight container. That last bit is funny. If there is more than one person in your house, I'm guessing the crackers won't last more than 24 hours.


A few notes/ thoughts: 

Roll them out thin. I went a little too thick. I used a pizza cutter to cut them - that worked well.

After cutting it might be good to chill the dough for a few minutes so they peel off the wax paper without tearing.

I also sprinkled a little kosher salt  on them - not in the recipe but still nice.

They are delicious!

Until next time, Eat Well & Keep Digging!

The Gastronomic Gardener
Garden blog http://amidwestgarden.blogspot.com/
Cooking blog http://ihopeyouarehungry.blogspot.com/
Twitter - www.twitter.com/DavidPOffutt
http://www.facebook.com/TheGastronomicGardener

Friday, December 31, 2010

Canadian Bacon - step-by-step

Continuing my love affair with pork, curing, and smoking, I decided to start some Canadian bacon so the pastrami will not get lonely in the smoker on Sunday.

Like the pastrami, this will be cured in a brine:

1 Gallon water
1 1/2 cups kosher salt
1 cup sugar
1 1/2oz cure
1 large bunch sage (from the garden, I love that it is still green)
2 gloves of garlic peeled and lightly smashed

Combine all ingredients in a large pot and bring to a simmer, stirring to dissolve the salt and sugar.


Meanwhile trim the fat from a pork loin. 


Let brine cool to room temperature, then chill (outside works perfectly today) until cold.

Add the brine to the loin in a nonreactive container. Submerge the loin - using a plate as needed to weigh it down. Refrigerate for 48 hours.

Remove the loin from the brine, rinse under cold water and pat it dry. You can see some of the deeper red color from the cure, you'll see more once we heat it up.


Put on a rack over a tray and refrigerate, uncovered for 12-24 hours.

At this point the recipe call for a hot smoke but I will cold smoke it, then finish in the same slow oven as the pastrami.

In the smoker... (with pastrami and the duck breasts)


After 6 hours out of the smoker.


Ready for the slow (275F) oven to finish cooking. The color change should be dramatic if cured properly.


Out of the oven. Beautiful color, it tightened up a lot. This thing is a brick.


Have to have a taste.- As you might suspect the end pieces will be somewhat salty, but the flavor is great. This is so easy, just takes time.


The next morning sliced it up for packaging in six slice packs. Headed to the freezer, but not before we do a final taste test.


Where it all comes together!


Until next time, Eat Well & Keep Digging!


The Gastronomic Gardener

Duck Proscuitto Step by Step

This one looked very easy, duck breasts, salt, and time. Just thinking about thin slices arranged around a plate, shaved Parmesan, and a light tossed salad makes me want to make it.

Here's what I did.

Ingredients:
Kosher Salt - a lot, (no pun intended)  about  4 cups.
4 duck breasts with skin and fat

Rinse and pat dry the duck breasts.


In a non reactive pan (I lined a half sheet pan with plastic wrap) put down a layer a layer a salt.


Next, nestle the breasts, skin side up close - but not touching on the bed of salt.


Cover with salt completely.


Wrap with plastic wrap and and refrigerate for 24 hours.
Remove the  duck from the salt, discard the salt and rinse thoroughly. Pat completely dry with paper towels.


Per the book, "The flesh should feel dense, and it's color will have deepened." Indeed!

Dust both sides with white pepper.


Wrap each breast in cheese cloth and tie with a string. Hang in a cool  humid place ( I'll use the basement)  for about 7 days.


I'm going to diverge for two of the breasts and cold smoke them with the pastrami and Canadian bacon before returning them to their place in the basement.


Into the smoker for 4 hours.


Out of the smoker.


Re-wrapped and ready to join the others hanging in the cool basement.


After 8 days, only one breast seems ready. The other two need a day or two more. But let's get back to the one that is ready. The brown on the string is from the smoke.


Unwrapped. It is firm but not hard.


Slice on a bias with a sharp knife. A lovely color, and a sheen of luscious fat.


Homemade duck breast proscuitto, baguette, arugula salad, shaved Cravero Parmigiano Reggiano, olive oil and balsamic reduction.


Are you kidding me?  Salty, toothsome, silky. Wow!

Make this now! It is so easy. Duck + salt + time = pure deliciousness.

Until next time, Eat Well & Keep Digging!


The Gastronomic Gardener
Garden blog http://amidwestgarden.blogspot.com/
Cooking blog http://ihopeyouarehungry.blogspot.com/
Twitter - www.twitter.com/DavidPOffutt
http://www.facebook.com/TheGastronomicGardener
Related Posts Plugin for WordPress, Blogger...