Showing posts with label Bacon. Show all posts

Wednesday, June 15, 2011

Not your Grandma's Shrimp and Grits


I had some left over polenta from the other day that I had poured into a pan. One thing I like about polenta is how it sets up, making a wonderful item for sauteeing to a crispy crust and then adding whatever suits your fancy.

I've had a taste  for shrimp and thought... hmmm shrimp n grits. But let's tart them up a bit shall we? As in most of the things I make, nothing difficult here, but the outcome is delicious! Here's how I did it.

Ingredients:
6 huge shrimp - (6-8 count)
2 "pucks" of polenta - you could cut whatever shape you want
6 slices of bacon chopped into little pieces
2 Tbs chopped parsley
2 green onions chopped
1 clove garlic minced fine
Juice of 1 lime
1-2 Tbs olive oil
Salt and pepper to taste


Directions:
Preheat oven to low

Over medium- high heat, add the olive oil to a pan

Season the polenta pucks and shrimp with salt and pepper

Add polenta to pan and brown on both sides.


Remove polenta to oven safe dish, put in the warm oven.

Wipe out the pan and add the bacon. Cook until fat renders and bacon is getting crispy.


Remove bacon to paper towel lined plate with a slotted spoon or spatula.

Add the shrimp to pan and cook until just cooked through and pink, about 2 minutes per side.

Do Not Over Cook!


Add the onion, garlic, parsley and lime juice. Toss to coat and remove from heat.


I plated it up, puck on the bottom, three fat and succulent shrimp, some of the sauce and garnish with bacon bits.


Creamy polenta with a little crunch, tender shrimp, the lime adding just the right amount of acid and tang, and the smoky bacon. No it's not your grandma's shrimp and grits, and yes, it's a tad fussy presentation, but it was damn good! Put it on your menu soon!

Until next time Eat Well and Keep Digging!

The Gastronomic Gardener
Garden blog http://amidwestgarden.blogspot.com/
Cooking blog http://ihopeyouarehungry.blogspot.com/
Twitter - www.twitter.com/DavidPOffutt
http://www.facebook.com/TheGastronomicGardener

Sunday, February 20, 2011

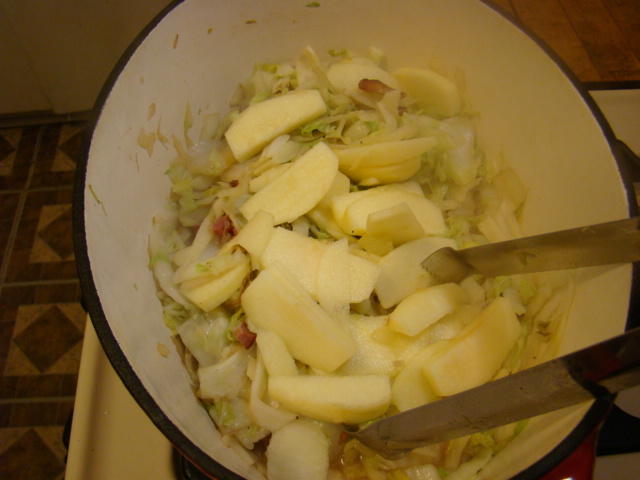
Braised Napa Cabbage with Fennel and Apples


Cabbage is such a homely vegetable. Years of mistreatment can lead to indelible scars and get folks to not like it. Then again, it  can be so poorly done, yet is versatile and keeps wonderfully. It can be eaten raw (think slaw) cooked (braised), or preserved (sauerkraut or kimchi). Nutritionally, it is high in vitamins C and K.

By the way, and I don't normally preach, but studies suggest that women with a diet high in brassicas (cabbage, brussels sprouts, broccoli, cauliflower and others) have a lower incidence of breast cancer.  Food for thought...

I have a lovely head of Napa cabbage and want to cook something comforting for dinner.

Ingredients:
1 head Napa Cabbage
1 Fennel bulb
1-2 apples
Juice of half a lemon
2.5 oz of bacon ( 2-3 slices)
chicken stock (or water or vegetable stock or wine)
salt and pepper to taste


One of the nice things about curing, smoking, and slicing your own bacon is that I have bunch of little bags of bacon ends in the freezer. It adds a salty, smokey, porky note to anything you are cooking. Of course you could skip it and use any fat of your choice, oil, or butter. I love the flavor of the bacon, so that is what I am using.


Directions:
Brown bacon in a heavy dutch oven over medium high heat.


While bacon browns, core and slice the cabbage and apples. Slice the fennel.


Add the cabbage and fennel, stir to coat in the fat. Cook stirring often until the cabbage begins to brown, about 7-9 minutes.


Add juice of 1/2 lemon and the apples. Cook another 3 minutes.


Add 1 and 1/2  cups stock or enough to almost cover cabbage apple fennel mixture.


Bring to boil, reduce heat to low and cover. Braise for 1 hour.

Check seasoning, adjust salt and pepper.

At the end, I added a smoked Kielbasa to the dutch oven to steam/cook.


Serve with steamed buttered new potatoes.


The wife liked it, and said the cabbage was not bitter, must be a function of the apples and fennel.

Try some today!


Until next time, Eat Well & Keep Digging!

The Gastronomic Gardener
Garden blog http://amidwestgarden.blogspot.com/
Cooking blog http://ihopeyouarehungry.blogspot.com/
Twitter - www.twitter.com/DavidPOffutt
http://www.facebook.com/TheGastronomicGardener

Tuesday, February 15, 2011

Spaghetti Carbonara


As you might know I'm participating with a bunch of other bloggers in Charcutepalooza, a year of meat. This months challenge was the salt cure - or making bacon!

I've made the bacon.

Now it's time to cook with it. Spaghetti Carbonara is a simple recipe of bacon, cream, egg yolks, and Parmesan. A little butter and olive oil to cook the bacon, some garlic and that's it.


Put the water on to boil.

Chop the bacon.
Chop the garlic and separate the yolks from the whites.


Add 1 Tbs butter and 1 Tbs of olive oil to large pan over medium high heat.

When water comes to boil add the pasta.

Add the bacon to the pan with butter and oil. Cook until it renders some fat.

Add the garlic. Stir.

While pasta and bacon cooks stir together the egg yolks and 4 oz of cream.

When pasta is done, drain and add to the bacon mixture. Remove from heat.

Add Parmesan, and while stirring, slowly add the cream egg mix. Toss / stir to coat pasta evenly.

Plate and top with a little more Parmesan and a generous grind of black pepper.


This is a fast, simple, satisfying dinner!

Until next time, Eat Well & Keep Digging!


The Gastronomic Gardener
Garden blog http://amidwestgarden.blogspot.com/
Cooking blog http://ihopeyouarehungry.blogspot.com/
Twitter - www.twitter.com/DavidPOffutt

Saturday, February 12, 2011

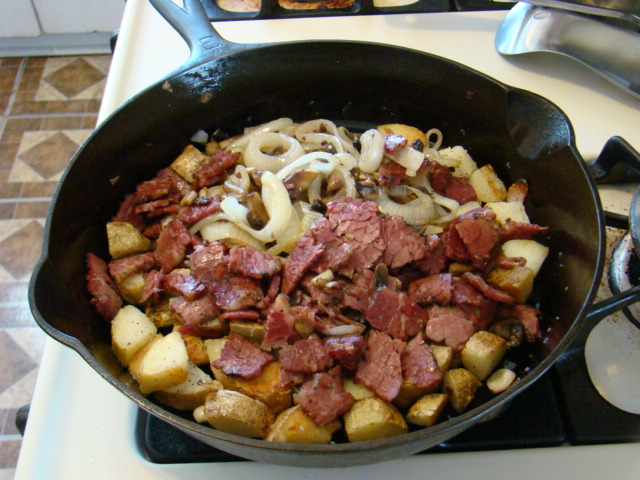
Pastrami Hash


Corned beef hash often conjures thoughts of pink glop from a can, seared in a pan until crusty. The canned stuff looks and smells like dog food.  But home made? It is a crispy chewy and tender delight.

The word hash comes from old French  "hacher" - to cut up, (derivative of hache ax, hatchet) so anything chopped up and cooked in pan can rightfully be called a "hash".

But I digress, and I'm hungry. I've got some pastrami that I made and a few left over baked potatoes. Sounds like makings of hash to me!

You can make hash out of almost anything, leftover meat (chicken, beef, pork), some chopped vegetables but I think potatoes are a necessary ingredient.

My best tip for this is to cook the components separately before combining them at the end. They all have different cook times so this method gives you more control than if you were to just put them all in the pan at the same time.

Ingredients:
Vegetable oil
Bacon
Diced potatoes
Sliced onion
Diced pastrami


Crisp up the bacon in a heavy skillet over medium heat - rendering the fat.


While I was doing this, I found some mushrooms in the crisper, so I chopped them up as well.


After the bacon is crisp and the fat is in the pan , remove the bacon  to a paper towel covered plate.

Add the onions and mushrooms, reduce heat to medium low. You want to stew the onions, not brown or crisp them.


Remove the cooked vegetables to a plate.

Add the chopped pastrami (or corned beef or chicken or pork or...)


The pastrami rendered a little fat, and while it took on a pretty dark red (cured meat reacting with heat) and looks crispy, it is in fact meltingly tender.


Remove from pan, add the potatoes and increase the heat to medium high.


Add a spot of oil if needed. I wanted the potatoes to have a crunchy golden crust.


Add the meat, and onion/mushroom mixture back to the pan.


Toss together and heat through. Serve with a fried egg on top. My friend Marcy gave me that egg from her chickens. Some folks might like ketchup, others a splash of vinegar based hot sauce. Do as you like.


Sweet onion, peppery pastrami, crispy potatoes awash in egg yolk. A darn fine breakfast!

For breakfast, lunch, or dinner; hash is a great way to use up what's on hand.

Until next time, Eat Well & Keep Digging.


The Gastronomic Gardener
Garden blog http://amidwestgarden.blogspot.com/
http://www.facebook.com/TheGastronomicGardener

Friday, December 31, 2010

Canadian Bacon - step-by-step

Continuing my love affair with pork, curing, and smoking, I decided to start some Canadian bacon so the pastrami will not get lonely in the smoker on Sunday.

Like the pastrami, this will be cured in a brine:

1 Gallon water
1 1/2 cups kosher salt
1 cup sugar
1 1/2oz cure
1 large bunch sage (from the garden, I love that it is still green)
2 gloves of garlic peeled and lightly smashed

Combine all ingredients in a large pot and bring to a simmer, stirring to dissolve the salt and sugar.


Meanwhile trim the fat from a pork loin. 


Let brine cool to room temperature, then chill (outside works perfectly today) until cold.

Add the brine to the loin in a nonreactive container. Submerge the loin - using a plate as needed to weigh it down. Refrigerate for 48 hours.

Remove the loin from the brine, rinse under cold water and pat it dry. You can see some of the deeper red color from the cure, you'll see more once we heat it up.


Put on a rack over a tray and refrigerate, uncovered for 12-24 hours.

At this point the recipe call for a hot smoke but I will cold smoke it, then finish in the same slow oven as the pastrami.

In the smoker... (with pastrami and the duck breasts)


After 6 hours out of the smoker.


Ready for the slow (275F) oven to finish cooking. The color change should be dramatic if cured properly.


Out of the oven. Beautiful color, it tightened up a lot. This thing is a brick.


Have to have a taste.- As you might suspect the end pieces will be somewhat salty, but the flavor is great. This is so easy, just takes time.


The next morning sliced it up for packaging in six slice packs. Headed to the freezer, but not before we do a final taste test.


Where it all comes together!


Until next time, Eat Well & Keep Digging!


The Gastronomic Gardener

Saturday, December 18, 2010

Cold smoked sausages

With the smoke shack built and tested it is time to do a little more. I have a chunk of cured pork belly, and the ingredients for bratwurst and kielbasa. I'm using recipes from Bruce Aidells' Complete Sausage Book.

Here are the two plates of spices measured out, one for each type of wurst. For the kielbasa:

and the bratwurst.


The mixes are similar with the kielbasa calling for much  more garlic, and the bratwurst needing mace and ground mustard seed. Since they are both going into the smoker, I used the salt I smoked in the test run for extra smokey flavor

The pink is the curing salt. 6.25% sodium nitrite. It is required because the sausages will be air dried and cold smoked and it inhibits bacteria growth, particularly that responsible for botulism (Clostridium botulinum). In very high doses it is toxic, so it is dyed pink to prevent mistaking it for sugar or salt. If you're interested, we can discuss nitrites and nitrates further.

The basic sausage making is described in this old post. The process is the same here.

Cut up the meat,


Spice and grind,  chill and stuff into casings. It sounds so easy, but it took about 4 hours as I clean and disinfect all equipment between grinding and stuffing. And this of course was two batches. In the end we have 4 big kielbasas.


Before they go into the smoker, the instructions indicate to hang the sausages in front of a fan overnight.


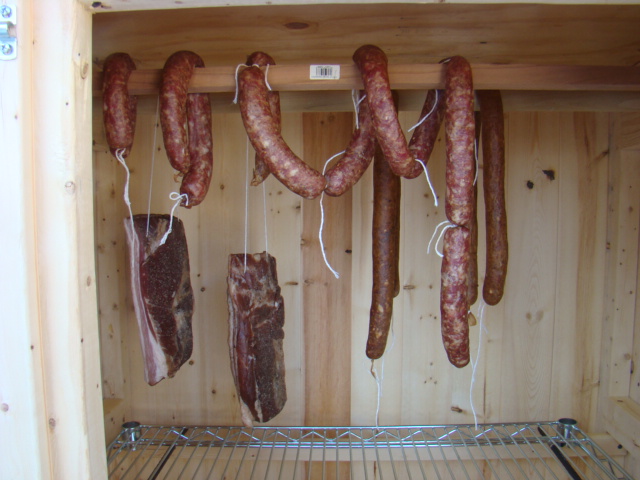
Ready for the smoker, also have the cured and pepper pork belly.


Into the smoker.


Smoke for 12 hours. It was very cold so I did use a small propane heater to keep the smoke box above freezing. I also switched from wood chips, to chunks, they burned longer.


 All ready to poach and eat and enjoy! 

Until next tinme Eat Well & Keep Digging!


The Gastronomic Gardener
Garden blog http://amidwestgarden.blogspot.com/
Cooking blog http://ihopeyouarehungry.blogspot.com/
Twitter - www.twitter.com/DavidPOffutt
http://www.facebook.com/TheGastronomicGardener
Related Posts Plugin for WordPress, Blogger...