Showing posts with label Bread. Show all posts

Sunday, July 24, 2011

Summer Squash Bread

It's mid-summer and has been hot as the blazes lately, but the thunderstorms all  morning have put me in a cocooning kind of mood. To me a stay-in Sunday just begs for baked goods.

Almost everyone has had zucchini bread. But I have no zucchini. - No matter, I have crooked neck squash and that should be close enough.


When they get big and bumpy like this the center can be a bit pithy - just scoop it out.

Ingredients:
3 cups all-purpose flour
1 teaspoon salt
1 teaspoon baking soda
1 teaspoon baking powder
3 teaspoons ground cinnamon

3 eggs
1 cup vegetable oil
2 1/4 cups white sugar
3 teaspoons vanilla extract

2 cups grated crooked neck squash
1 cup chopped walnuts
1/2 cup raisins

Directions:
Grease and flour 2 loaf pans

Preheat oven to 325F

Sift flour, salt, baking powder, soda, and cinnamon together

Beat eggs, oil, vanilla, and sugar together in a large bowl.


Add sifted ingredients to the wet mixture, and beat well.


Stir in squash, nuts and raisins until well moistened and evenly incorporated


Pour batter into loaf pans

Bake for 40 to 60 minutes, or until a pick inserted in the center comes out clean 

Cool in pan on rack for at least  20 minutes. Remove bread from pan, and completely cool.


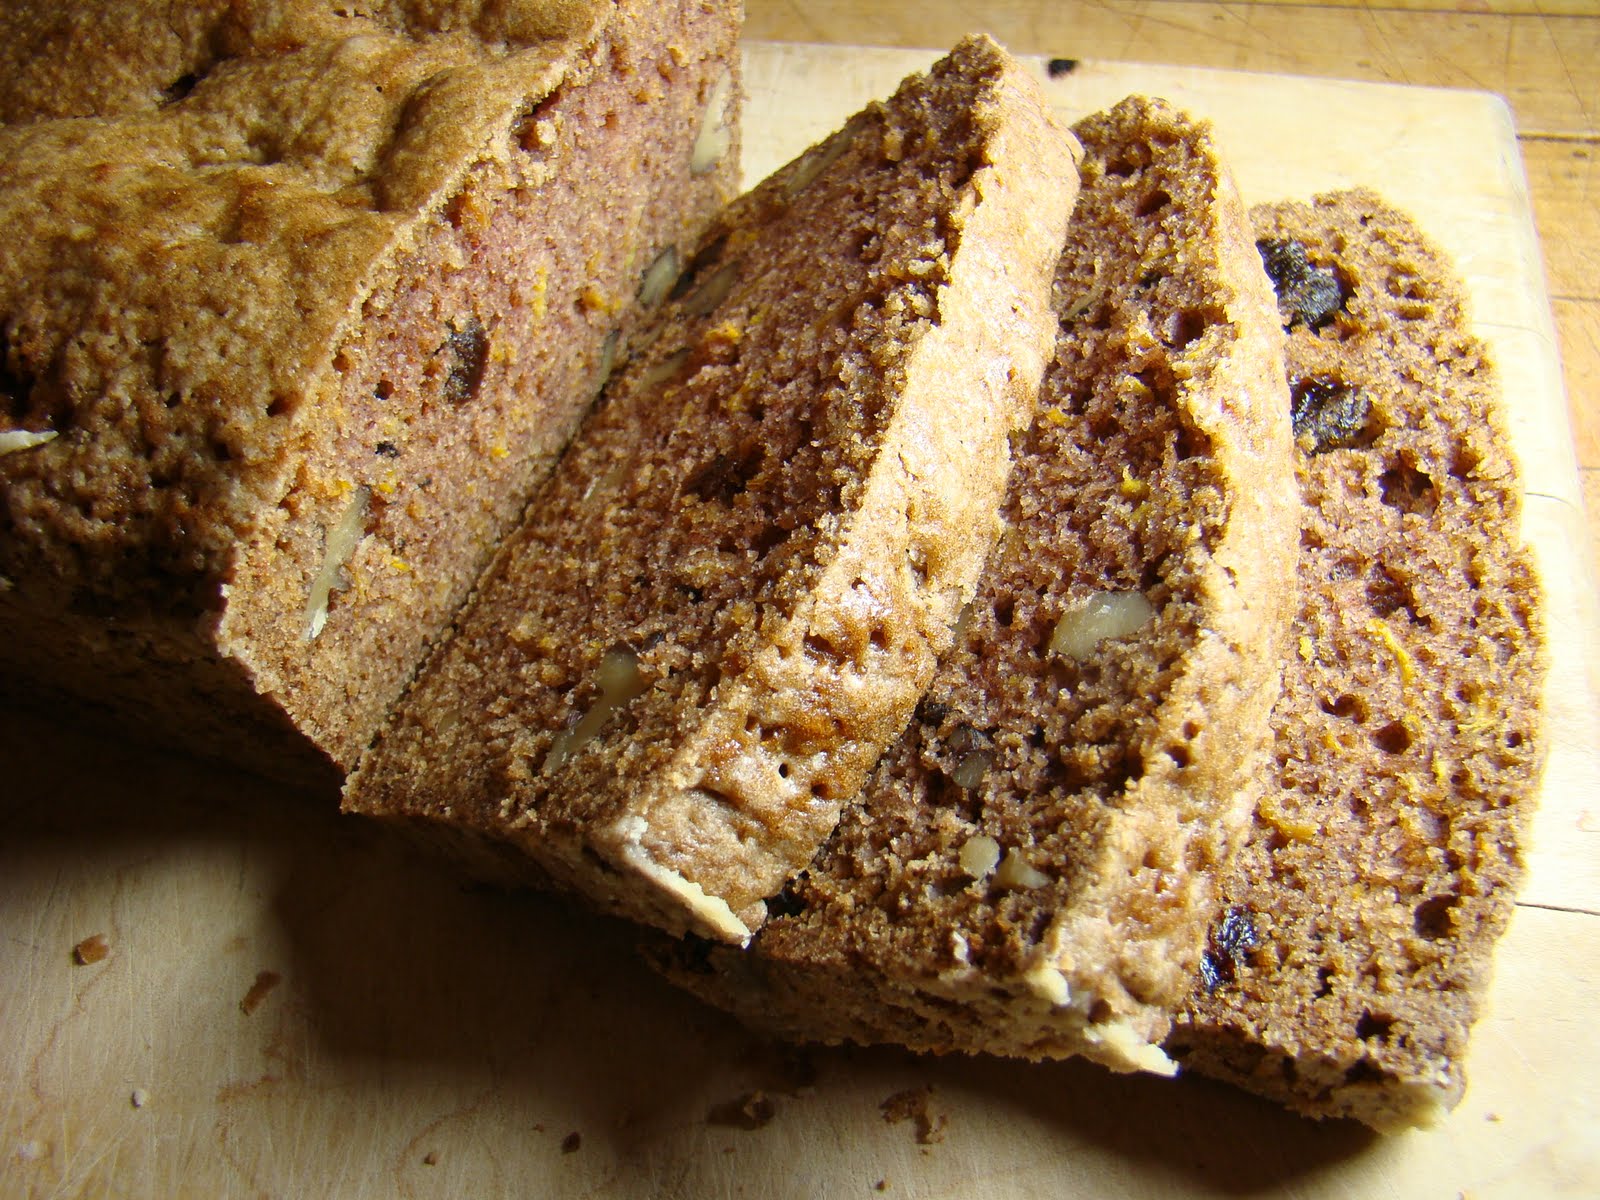
This bread is excellent toasted, it also freezes well, just be sure it is completely cooled and well wrapped before freezing.


Until next time, Eat well and Keep Digging!

The Gastronomic Gardener
Garden blog http://amidwestgarden.blogspot.com/
Cooking blog http://ihopeyouarehungry.blogspot.com/
Twitter - www.twitter.com/DavidPOffutt
http://www.facebook.com/TheGastronomicGardener

Monday, February 7, 2011

Homemade Naan


If you've been following along, you know I am a big fan of the no knead bread recipes. Fortunately the second one I tried also can be used for Naan, which will accompany my Meatless Monday Vegetable Curry, which utilizes the Basic Curry Sauce I made yesterday.

For the Naan:

Start with the basic bread recipe.

I cut up some garlic to use one it, purely optional.


You'll want a large heavy skillet, and about a tablespoon of oil.

Heat the pan over high heat.

Dust board with a little flour.

Take a peach sized piece of the premade dough, dust with a little flour and put it on the board, roll it out to about 8- 9 inches diameter and about 1/8" thick. Use minimal flour - just enough to keep from sticking.

This is where I added the garlic.


When the pan is hot and drops of water skitter across the surface before they evaporate, add the oil (or ghee) coat the bottom of the pan and pour out the extra oil. I got two naan from 1 tbs oil.

Put the dough round in the pan, reduce heat to medium.


Cover to trap heat and steam. Notice my fancy cover!


Check for doneness with a spatula after about 3 minutes or sooner if you smell it overcooking. That's a nice way to say burning,

It was pretty spectacular when i removed covering sheet pan!


Though it is a bit dark.


I made another one without garlic and had better control over the heat. Sorta like pancakes - you always burn the first one or two!


Served it tonight with the Vegetable Curry.   


Give this versatile recipe a try!

Until next time Eat Well  & Keep Digging! 


The Gastronomic Gardener
Garden blog http://amidwestgarden.blogspot.com/
Cooking blog http://ihopeyouarehungry.blogspot.com/
Twitter - www.twitter.com/DavidPOffutt
http://www.facebook.com/TheGastronomicGardener

Tuesday, October 5, 2010

Snacks

A late season harvest of radishes provided  a nice snack before dinner tonight. Left over baguette, a touch of butter, sliced radish. a crunchy chewey treat. 


Last night for Monday Night Football, I decided to have some special treats.


Clockwise from upper left, Grapes, homemade apple butter, baguette,  cured duck sausage ( it was quite ducky!), cheese, stone ground mustard, Bosch pear.

Sometimes I like snacking more than a full meal. Ever go into a restaurant and just order a few appetizers in lieu of an entree?

So for this post, I produced the radishes and the apple butter.

The Gastronomic Gardener
Garden blog http://amidwestgarden.blogspot.com/
Cooking blog http://ihopeyouarehungry.blogspot.com/
Twitter - www.twitter.com/DavidPOffutt
http://www.facebook.com/TheGastronomicGardener

Tuesday, September 7, 2010

Panzanella

Not in the mood for a big dinner production tonight, I looked around the kitchen. So I have some Italian bread that has seen better days, tomatoes from the garden, a giant cucumber, basil, ... hmmm...

Ah! Panzanella!

A good way to not waste anything and a pretty fast and hearty salad. That's right, bread salad.

Ingredients:
Slightly stale bread
tomatoes
garlic
red onion
cucumber
basil
olive oil
balsamic (or any other you like) vinegar
salt and pepper to taste


Cut a garlic clove and rub in the salad bowl. Discard
Mince the remaining garlic and slice the red onion - add to bowl.


This cucumber is a monster! Peel, halve, remove seeds and cut into a big dice. Add to bowl.
Chop the tomatoes, tear the bread up. Add to bowl.
Shred basil by hand, add to bowl.


Add generous amount of olive oil and vinegar and toss. Add salt and pepper to taste.


Serve it up and enjoy.


Dinner in less than 10 minutes! Warm some soup while you are making this and you have a very filling meal.


The Gastronomic Gardener
Garden blog http://amidwestgarden.blogspot.com/
Cooking blog http://ihopeyouarehungry.blogspot.com/
Twitter - www.twitter.com/DavidPOffutt
http://www.facebook.com/TheGastronomicGardener

Tuesday, June 22, 2010

Easy Bread #2


I've already talked about Jim Lahey's fabulous No-Knead Bread here: http://ihopeyouarehungry.blogspot.com/2010/06/no-knead-bread.html

That is a really great recipe and makes an impressive loaf with a super crust. However - it takes 18 hours and unless you have a ton of counter space you're not going to have these loaves in constant production. At least I'm not. I save it for a party, a planned dinner etc...

But what if you want fresh bread day to day? Well, thanks to the book Artisan Bread in Five Minutes a Day: The Discovery That Revolutionizes Home Baking you can.
 

I have been messing with the basic recipe for about a month. It makes a great loaf for dinner after work, rolls, even pizza! In fact, the pizza in the header of my blog comes from this recipe.

It is very straightforward and simple - plus, once you stir the dough - you can have bread from the batch for up to two weeks. The longer it goes in the fridge (yes, the fridge!) the more character and sough-dough attributes it takes on. Unlike the requirement for a heavy pot with a lid, this method needs a pizza stone and peel - though the back of a cookie sheet could be used in a pinch for getting a loaf into the oven, and a broiler pan for water. This is crucial for a crisp crust.

Let's make the basic recipe.

Ingredients
3 cups lukewarm water
1.5 TBS granulated yeast
1.5 TBS kosher salt or other course salt
6.5 cups unsifted, unbleached, all purpose white flour measured by the "scoop and sweep" method
Cornmeal for pizza peel


Put  warm water into container, add yeast and salt.
Add flour and stir till no longer dry.
Now the easy part, put a lid on it (not airtight) and let it sit on the counter for a couple (2) hours. You can use a portion of the dough at any time after this point. Look how much it has risen and the nice bubble activity from the yeast.
 For now we put it in the fridge.

The next day.....

I assemble the needed equipment -
Pizza peel.
 
Put the baking stone and broiler pan in the oven.
 
Add some corn meal to the peel to allow the loaf to slide off.
 
Sprinkle the surface of the dough in the bucket with a little flour. Grab about a grapefruit size piece of dough.
 
Sprinkle a little flour on that and turn the dough moving the top to the bottom as you go until you have a smooth surface.
 
Put the dough on the cornmeal "lubricated" peel. Set the timer for 20 minutes. The bread will rest for 40 minutes, but 20 minutes from baking we'll preheat the oven (with the stone and the pan inside) to 450F.
 
As I said this will not make a large loaf but it is good for up to 4 people for dinner.

Just before baking sprinkle a little flour on top of the doughball and slash with a serrated knife. The flour keeps the knife from sticking. The authors call this "Dust and Slash." Catchy, huh?
 
At baking time run a cup hot water into a measuring cup.

Slide the loaf  onto the stone and quickly add the hot water to the pan. This is the secret to a crunchy crust.

Bake for 30 minutes and this is what you get.
 
 
Let this cool, slice, and eat!

Enjoy!

Sunday, June 13, 2010

No Knead Bread

Thanks to Jim Lahey (http://www.sullivanstreetbakery.com/recipes/noknead.html) great bread is easy to do. Impress your friends! Eat well! The only thing you need is a heavy - preferably cast iron, pot with a lid that can go into a 450F oven.

The book, My Bread: The Revolutionary No-Work, No-Knead Method is the ultimate resource.


Here is the basic recipe as printed in the NY Times November 8 2006. The pictures are mine.

3 cups all purpose flour
1/4 teaspoon instant yeast (you can use a little  more)
1 1/4 teaspoon salt
1 5/8 cups water
cornmeal or wheat bran as needed


1. In a large bowl combine flour, yeast and salt. Add 1 5/8 cups water, and stir until blended; dough will be shaggy and sticky. Cover bowl with plastic wrap. Let dough rest at least 12 hours, preferably about 18, at warm room temperature, about 70 degrees.


2. Dough is ready when its surface is dotted with bubbles. Lightly flour a work surface and place dough on it; sprinkle it with a little more flour and fold it over on itself once or twice. Cover loosely with plastic wrap and let rest about 15 minutes.


3. Using just enough flour to keep dough from sticking to work surface or to your fingers, gently and quickly shape dough into a ball. Generously coat a cotton towel (not terry cloth) with flour, wheat bran or cornmeal; put dough seam side down on towel and dust with more flour, bran or cornmeal. Cover with another cotton towel and let rise for about 2 hours. When it is ready, dough will be more than double in size and will not readily spring back when poked with a finger.


4. At least a half-hour before dough is ready, heat oven to 450 degrees. Put a 6- to 8-quart heavy covered pot (cast iron, enamel, Pyrex or ceramic) in oven as it heats. When dough is ready, carefully remove pot from oven. Slide your hand under towel and turn dough over into pot, seam side up; it may look like a mess, but that is O.K. Shake pan once or twice if dough is unevenly distributed; it will straighten out as it bakes. Cover with lid and bake 30 minutes, then remove lid and bake another 15 to 30 minutes, until loaf is beautifully browned. Cool on a rack.

and here you are:


Yield: One 1 1/2-pound loaf.

Loaves are wonderful, crusty, yeasty goodness. This one was one of my first efforts.
Related Posts Plugin for WordPress, Blogger...