Sunday, May 29, 2011

Merguez - Spicy lamb sausage


Since I was ordering from the butcher anyway, I decided to order some lamb shoulder to make some Merguez, a spicy lamb sausage from North Africa. I figured it would be great slow roasted on the grill.

This adapted from Charcuterie by Michael Ruhlman and Brian Polcyn.  You'd think that I'm getting a cut but no, I'm just loving the cookbook.

Ingredients
3.5 lbs diced lamb shoulder
1.5 lb lamb fat diced
1.5 oz Kosher Salt
2 tsp sugar
1 tsp red pepper flakes
2 Tbs minced garlic
1.5 cups diced roasted red pepper
1.5 tsp freshly ground black pepper
2 Tbs Spanish paprika (I used Picante, you could use Dulce)
2 Tbs minced fresh oregano
1/4 cup dry red wine, chilled
1/4 cup ice water


20ft sheep casing soaked and rinsed

Directions:
Combine all ingredients except the water and wine (OR casings!) and toss to distribute the seasonings.


Chill until ready to grind. In this case it was from about 3 to 9 the next morning.

Grind mixture through small die,  add water and wine to meat mixture and mix until liquids are incorporated and the mixture has developed a uniform sticky appearance. Sorry for no pictures but this sausage is red from the paprika. Working the grinder/ mixer/stuffer was difficult enough as it was without trying to capture action shots. Sorry for that.

Cook a small sample for taste test. (delicious)

Stuff into lamb casings and twist into 10" links. Refrigerate or freeze until ready to use. Well that's in instructions but  I coiled some up and left some long. The coils work great on the grill with a couple skewers threw them.  They are chilling for now getting ready to be frozen.


To cook roast (or grill on indirect heat) or gently saute to an internal temp of 150F.


Served with rice, garlic chili sauce and a simple salad.


Until next time, Eat Well & Keep Digging!


The Gastronomic Gardener
Garden blog http://amidwestgarden.blogspot.com/
Cooking blog http://ihopeyouarehungry.blogspot.com/
Twitter - www.twitter.com/DavidPOffutt
http://www.facebook.com/TheGastronomicGardener

Thursday, May 26, 2011

Walnut Walleye


My apologies, I've been busy over at the garden so it's been a while since I've posted here.

There are still a few walleye fillets left from last summer. You could use any firm white fish and probably any nut you'd like. Just don't grind/crush the nuts too finely.  Here's what I did with them:

Walnut Walleye

Ingredients:
1 large walleye fillet - enough for two portions
1/2 cup nuts - crushed but not pastey
1 egg lightly beaten
3 Tbs butter ( you could use less)
1 Tbscapers
2 Tbs lemon juice
salt and pepper to taste


Directions:

Preheat oven to 400F
Trim and portion the fish. Season with salt and pepper.


Crack and beat the egg, dip the fish portion in the egg wash.


Press the egg coated fish into the crushed nuts


Reserve to plate.


Preheat oven proof pan over medium high heat. Add the butter, when butter is melted  but not browned, add the fish.


Saute gently for 2 -3 minutes, then transfer pan to hot oven for six minutes.

Remove pan, remove fish from pan, add lemon juice and capers to residual hot butter in pan.


Plate fish, spoon some sauce over the fish and serve with sides of your choice.


Mild tender fish, crunchy topping, tart sauce, there is a lot going on in this fast and simple dish. Give it a try!

Until next time, Eat Well & Keep Digging!

The Gastronomic Gardener
Garden blog http://amidwestgarden.blogspot.com/
Cooking blog http://ihopeyouarehungry.blogspot.com/
Twitter - www.twitter.com/DavidPOffutt
http://www.facebook.com/TheGastronomicGardener

Monday, May 16, 2011

Meatless Monday Zucchini and Black bean Quesadillas


After last night's porky fiasco, I was looking forward to Meatless Monday, and some simple fare that didn't involve the likely ingestion of carpet fibers.

This is a super simple meal, yet it was surprisingly filling and delicious. It was fast too, perfect for a busy weeknight.

There isn't a ton of cheese, just enough to hold everything together. Feel free to jazz this up as you see fit. Wringing the water out of the zucchini is key to the success of this recipe.

Ingredients:
1 lb zucchini grated - about 2 medium (7")
1 jalapeno pepper seeded and diced fine
1 15 oz can blackbeans drained and rinsed
1/2 medium onion sliced very thin
8 oz grated cheese
6-8 flour tortillas 8" diameter
olive oil
salt


Grate the zucchini


Add a generous pinch of salt and put zucchini into a colandar.

Grate the cheese, drain and rinse the beans.

Dice the jalapeno and slice the onion.


Put the zucchini in a non terry cloth dish towel.


Wrap the loose ends of the towel and (over a sink or a bowl) wring out the moisture, I easily got a cup. See how much the squash compresses?


Add squash, beans, onions, jalapeno and cheese to a big bowl. Mix together thoroughly.


Preheat large griddle or pan. Brush oil on one side of a tortilla, place in heated pan oiled side down, add a generous amount of the bean zucchini mixture.


Oil another tortilla and place it over the filling, oiled side up. Cook until bottom tortilla is golden brown, flip and cook other side.


Cut into quarters and served with homemade salsa, and yogurt.


Crispy, flaky tortilla, dense and satisfying filling. And just one was enough for dinner. Be sure to give this one a try!


Until next time, Eat Well & Keep Digging!

The Gastronomic Gardener
Garden blog http://amidwestgarden.blogspot.com/
Cooking blog http://ihopeyouarehungry.blogspot.com/
Twitter - www.twitter.com/DavidPOffutt
http://www.facebook.com/TheGastronomicGardener

Sunday, May 15, 2011

Oven Roasted Babyback Ribs & Disaster!?


After my post on using the smoker, I had an email that asked what to do if you don't have a smoker, or a BBQ grill. You can easily oven roast pork ribs, you may not get that smokey flavor but that doesn't mean they won't be delicious in their own right!  (If you need the smokey flavor - add a tsp of liquid smoke to the mustard, but personally I'd skip it. No sense trying to pretend to be something it isn't when what it is, is damn fine.)

Today we'll do 2 racks of babybacks. And learn that things don't always go as planned.

Ingredients:

Dry Rub Recipe ( you won't use all of it for this dish)

1/3 cup brown sugar
1 TBS Coarse salt
1 TBS Sweet Spanish paprika "Dulce"
1 tsp garlic powder
1 tsp ground cumin
1 tsp ground mustard
1 tsp oregano
1/2 tsp thyme
1/2 tsp black pepper
1/2 tsp chili powder

2 racks babyback ribs 
4-5 TBS Dijon Mustard
BBQ sauce  (optional)


Remove ribs from package, pat dry with paper towels.

Remove membrane from the back of the ribs. Slide a table knife under the membrane to loosen it up.  If necessary, use a paper towel to grab the membrane and pull it off. Yes I use gloves, I often do in the kitchen or the garden. These are Nitril powderless gloves. You retain tactile sensitivity while keeping your hands clean.


Coat generously with  rub, more on the meat side than the bone side - At this point the ribs can go back into the fridge or you can brush them with the mustard now.


My mouth waters just looking at the rub as it extracts moisture from the meat.


Preheat oven to 250.

Brush ribs with mustard.


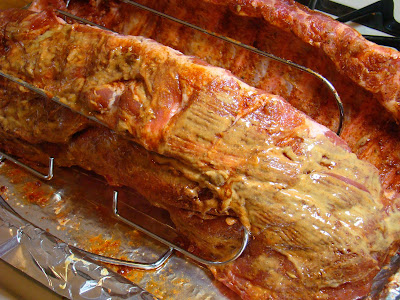
Line a large baking sheet with sides (a jelly roll pan) with heavy duty foil. Put a cooling rack on it and place ribs on rack OR use a rib rack placed on the foil lined pan.


Roast for 1.5 - 2 hours, until meat is tender. Spare ribs will need about an hour more time than the babybacks. The reality is, I checked at 2 hours and the oven was only holding at 230 so I increased the heat and let them go another 1.25 hours.

Pull them from the oven. They look good.


If saucing, remove ribs from rack, set rack aside, pour off fat from pan, place ribs back into pan, spread sauce and broil - until sauce is hot and bubbly - be careful not to burn it.

While that was going I made some sweet potato fries.


Plated it up one dry, one sauced.


So there I was, plate of deliciousness, a glass of wine. And I misjudged the edge of the table....

Imagine super slow motion, the plate slipping from my grasp and slowly overturning while I shrieked Nooooooooooo!

Clump! Perfectly upside down on the floor, BBQ sauce and ketchup (not in the picture, guilty as charged) embedded into the carpet.

What would you do? Don't judge me but....

Five second rule and blotting the stain until I think it's gone was my strategy.

The ribs were good, but more roast porky than ribby goodness. A surprise? Not really,  but I prefer the smoker or the grill. In a pinch this works, but since I have the tools, I'll use them next time.

Now where is that oxy-clean?

Until next time, Eat well & Keep Digging!


The Gastronomic Gardener
Garden blog http://amidwestgarden.blogspot.com/
Cooking blog http://ihopeyouarehungry.blogspot.com/
Twitter - www.twitter.com/DavidPOffutt
http://www.facebook.com/TheGastronomicGardener

Monday, May 9, 2011

Meatless Monday - Morel Cream Sauce with Peas and Pasta


Yesterday we went Morel hunting in the woods. Today we'll cook some up! This is a loose recipe, and very simple. A quick saute of mushrooms, a simple roux, heavy cream, delicious and ready in less than 20 minutes.

Ingredients:
Morels  - halved and cleaned
4-6 oz Vegetable broth
3-4 oz heavy cream
2 Tbs butter
4 oz peas
Salt and Pepper to taste
Pasta


Aren't the Morels pretty?


Start water on to boil for the pasta - make it according to directions.

Add butter to pan over medium high heat. When it finishes foaming, add the mushrooms , brown lightly on both sides. Yes, these went a little long.  Yes, it still tasted great.


Remove the mushrooms from the pan, add the flour and stir it constantly for a few minutes to cook out the raw flour taste.


Add the broth and stir out any lumps, keep stirring until the mixture boils and thickens. Reduce heat to medium.


Add the peas and cook until tender. Add heavy cream, and mushrooms. Heat Through.


Add the cooked pasta, toss to coat.


Plate and Serve. You could grate some cheese on top if you want.


Pretty cool to have foraged for part the meal.

Until next time, Eat Well and Keep Digging


The Gastronomic Gardener
Garden blog http://amidwestgarden.blogspot.com/
Cooking blog http://ihopeyouarehungry.blogspot.com/
Twitter - www.twitter.com/DavidPOffutt
http://www.facebook.com/TheGastronomicGardener

Wednesday, May 4, 2011

Shiny New Toy trial run

For those of you following along, I built and used a cold smoker last fall and winter.  Since then I've been looking into a hot smoker.

Leading up up to my purchase, I looked at some of the cabinet smokers at the big box store - but they seem poorly built.

I don't have the metal working or welding skills (yet!) to construct my own. So, after more research on the internet, I went with the 18.5" (diameter) Weber Smokey Mountain, a charcoal fired smoker with two racks.


Today I fired it up for the first time - 1 large rack of pork spare ribs and a pork shoulder.

A generous amount of my homemade rub:

RUB Recipe

1/3 cup brown sugar
1 TBS Coarse salt
1 TBS Sweet Spanish paprika "Dulce"
1 tsp garlic powder
1 tsp ground cumin
1 tsp ground mustard
1 tsp oregano
1/2 tsp thyme
1/2 tsp black pepper
1/2 tsp chili powder

The shoulder needs to go about 8 hours so we'll start that first.


Next, fire up the smoker..... I'm using the "Minion Method"


I did throw on 3 chunks of  applewood, filled the water pan, set the lower rack and added the pork shoulder.


As this the first firing, I'll have to check often to keep the temp in the 225-250F range. I'm checking it every 10 minutes initially, hopefully I can stabilize it and let it go for 3 hours before I add the ribs. It did stabilize at 225 for several hours.

I added the spare ribs to the top rack.


I did have to add a bit more charcoal, and wood to take this to 9 hours total.

Glaze with your favorite sauce.


Plate up with some beans and slaw....


This was delicious, and it has a nice smoke ring.

The butt is cooling until I can shred it. Is it just me or does that sounds odd?

Until next time, Eat Well & Keep Digging!


The Gastronomic Gardener
Garden blog http://amidwestgarden.blogspot.com/
Cooking blog http://ihopeyouarehungry.blogspot.com/
Twitter - www.twitter.com/DavidPOffutt
http://www.facebook.com/TheGastronomicGardener
Related Posts Plugin for WordPress, Blogger...