Sunday, July 31, 2011

Carolina style Pulled Pork 'n slaw

What's going to make it Carolina style you ask? For one thing it's the sauce, BBQ sauces are highly regional, and even in North Carolina there are different favorites. I made a simple one, but boy is it good. Read on for the recipe.  Also making this "Carolina style" is the Red Slaw. That recipe is also below. My mouth is watering, and I just had it!


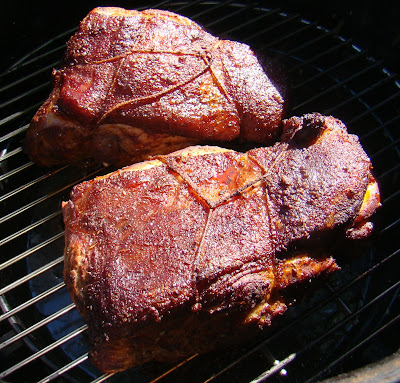
About 4 hours in I removed the lid to add the chicken (a different post in the works). They are definitely getting there!


After 7 hours


++++++++++++++++++++++++
While that was cooking I made  a Carolina "Red" slaw from this month's Saveur magazine (issue 139). It is pretty spicy.

Lexington-Style Red Slaw

Ingredients:
2/3 cup ketchup
1/2 cup apple cider vinegar
1/2 cup sugar
2 tsp hot sauce
2 tsp kosher salt
2 tsp ground black pepper
1 medium head of cabbage cored and finely chopped

Directions:
In a large bowl whisk together all ingredients except cabbage.
Add cabbage and toss to combine.
Allow to rest for 20 minutes, tossing occasionally.

Chill.

++++++++++++++++++++++++++++

I also made a super simple BBQ sauce appropriate to Carolina. It's not a thick sweet sauce that is favored in the U.S. Midwest, rather a tart/sweet thin sauce. (Before you jump all over me, there a million variations of this, I'm sure they are all good)

Simple Carolina BBQ sauce
Ingredients:
1 cup each - Ketchup, water, cider vinegar, sugar
1 big pinch of crushed red pepper

Directions
Combine all ingredients in a medium sauce pan, bring to a boil, then simmer 10 minutes.
Remove from heat, allow to come to room temperature then chill.
++++++++++++++++++++

At this point I chopped the pork. Normally I would pull it but I was in a hurry. I made way more than I can use but it does freeze very well, and I'll give some to some friends.


Now what I needed dinner! So here it is...


That plate lasted about 5 minutes.  Two recipes in one post, not a bad deal.

Until next time, Eat Well & Keep Digging!

The Gastronomic Gardener
Garden blog http://amidwestgarden.blogspot.com/
Cooking blog http://ihopeyouarehungry.blogspot.com/
Twitter - www.twitter.com/DavidPOffutt
http://www.facebook.com/TheGastronomicGardener
email: thegastronomicgardener at gmail dot com

Saturday, July 30, 2011

A Different take on Tabbouleh/Tabouleh/Tabouli


Tabbouleh is a traditional Mediterranean (Lebanese) grain salad. bulgar, parsley and mint form the basis of this light yet satisfying salad. Sadly there is a flavor I do not care for, and that is mint. Therefore, I have adapted the more traditional recipe to fit my tastes, replacing mint with cilantro. This is perfect summer fare, and can be a meal unto itself. It is also great on a buffet, as it will hold up for hours.

Besides being delicious, you only need to boil some water - so you won't heat up your kitchen on a hot summer day.

Feel free to adapt this recipe, substitute couscous or quinoa for the bulgar. Adaptations I made as I was making it  - I (gasp!) ran out of cilantro and parsley so it is not as fluffy as I would normally like it,  and for some reason I completely forgot the scallions/onions. You know what? It was still delicious! I ate it last night with the merguez I had in the freezer. A simple summer meal packed with flavor!


Ingredients:
1 cup Bulgar + boiling water to cover
1 small cucumber peeled, seeded and diced (if a very young fresh cucumber - use the whole thing)
2 jalapeƱo peppers seeded and finely diced (use less if sensitive to chilies)
½ cup cooked rinsed garbanzo beans (optional, but I love them)
1 cup packed chopped cilantro or parsley
1 cup chopped tomatoes
½ cup red onion, finely diced OR scallions minced. Use both the green and white part.
1-3 cloves garlic finely minced
1 tsp salt
¼ cup lemon juice (fresh is always better)
¼ cup olive oil
Salt and pepper to taste

Directions:
Put bulgar wheat in medium large bowl.

Add enough boiling water to cover wheat. Stir, cover and let stand until bulgar is tender – about 30 minutes. Drain.

Add salt, lemon juice, olive oil, garlic to bulgar. Mix well and cover – At this point bulgar mixture may be chilled for up to 24 hours.
30 minutes before serving add remaining ingredients and mix well.

Taste and adjust salt and pepper as needed.


Not perfectly traditional but cool and deeply satisfying nonetheless.

Until next time, Eat Well and Keep Digging!

The Gastronomic Gardener
Garden blog http://amidwestgarden.blogspot.com/
Cooking blog http://ihopeyouarehungry.blogspot.com/
Twitter - www.twitter.com/DavidPOffutt
http://www.facebook.com/TheGastronomicGardener

Wednesday, July 27, 2011

Sweet Pickle Relish

As I mentioned I have a whole bunch of cucumbers to use up. And I just picked another 2.5 lbs!

This time I've made sweet relish.

Sweet Pickle Relish (from Balls Blue Book of Preserving)

Ingredients
1 quart cucumbers, peeled, seeded and chopped
2 cups onions, peeled and chopped
1 green bell pepper, seeded and chopped
1 red bell pepper, seeded and chopped
1/4 cup salt
3 1/2 cups sugar
2 cups cider vinegar
1 Tbsp. celery seed
1 Tbsp. mustard seed


Directions:
I used my food processor  to process the vegetables very small, but you could also chop your vegetables by hand

Place vegetables in a large bowl. Sprinkle with salt and mix.

Cover with cold water and let stand 2 hours.

Drain, rinse and drain very well again.

Combine sugar, vinegar, celery seed and mustard seed in a non-reactive large pot. Bring to a boil, stir to dissolve sugar.

Add drained vegetables return to boil. Lower heat and simmer 10 minutes.

Pack hot relish into hot sterilized 1/2 pint jars, leaving 1/4 inch head space. Place caps on and tighten.

Place in hot water bath and process for 10 minutes.

Makes eight 1/2 pint jars.


I can't wait to try this on a burger!

Until next time, Eat well and Keep Digging!

The Gastronomic Gardener
Garden blog http://amidwestgarden.blogspot.com/
Cooking blog http://ihopeyouarehungry.blogspot.com/
Twitter - www.twitter.com/DavidPOffutt
http://www.facebook.com/TheGastronomicGardener

Monday, July 25, 2011

Zucchini cakes for Meatless Monday

It's that time of year when the zucchini can start to come on at a furious rate. I've only got one plant and it is keeping me happy with zucchinis. Checking them every day keeps them from become as big as tree trunks. But what to do with them?

I've made zucchini cakes before so thought I'd share them with you today. Simply put they are grated zucchini with a few add-ins, pan fried in a little olive oil.


Ingredients:
Zucchini - from garden
2 cloves garlic minced
Shallot
2 eggs
1/2 cup grated pecorino romano
3/4 cup bread crumbs
1 TBS flour
1/4 tsp baking  powder
Salt
Crushed red pepper
olive oil for cooking

Trim up the Zucchini


Line a bowl with a cotton dish towel (not terry cloth). Grate zucchini into the bowl.


Wring out the zucchini. Keep the zucchini juice for soup or, drink it as I did. Refreshing!


To the grated drained zucchini  add the cheese, shallot, garlic, eggs, bread crumbs, flour, baking powder, and a pinch of salt, pepper flakes. Stir to combine.


Heat 2 TBS  oilive oil in a skillet over medium high heat. Spoon about 1/4 cup for each cake, flatten with a fork.


Fry until brown, flip and brown other side.


Remove and drain on paper towel.
 
Plate, garnish with some chopped parsley and serve with dressing of your choice. I used Bleu cheese. Ranch would be good too.


Until next time, Eat Well and Keep Digging!

The Gastronomic Gardener
Garden blog http://amidwestgarden.blogspot.com/
Cooking blog http://ihopeyouarehungry.blogspot.com/
Twitter - www.twitter.com/DavidPOffutt
http://www.facebook.com/TheGastronomicGardener

Sunday, July 24, 2011

Summer Squash Bread

It's mid-summer and has been hot as the blazes lately, but the thunderstorms all  morning have put me in a cocooning kind of mood. To me a stay-in Sunday just begs for baked goods.

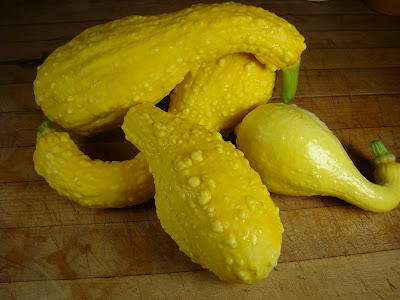
Almost everyone has had zucchini bread. But I have no zucchini. - No matter, I have crooked neck squash and that should be close enough.


When they get big and bumpy like this the center can be a bit pithy - just scoop it out.

Ingredients:
3 cups all-purpose flour
1 teaspoon salt
1 teaspoon baking soda
1 teaspoon baking powder
3 teaspoons ground cinnamon

3 eggs
1 cup vegetable oil
2 1/4 cups white sugar
3 teaspoons vanilla extract

2 cups grated crooked neck squash
1 cup chopped walnuts
1/2 cup raisins

Directions:
Grease and flour 2 loaf pans

Preheat oven to 325F

Sift flour, salt, baking powder, soda, and cinnamon together

Beat eggs, oil, vanilla, and sugar together in a large bowl.


Add sifted ingredients to the wet mixture, and beat well.


Stir in squash, nuts and raisins until well moistened and evenly incorporated


Pour batter into loaf pans

Bake for 40 to 60 minutes, or until a pick inserted in the center comes out clean 

Cool in pan on rack for at least  20 minutes. Remove bread from pan, and completely cool.


This bread is excellent toasted, it also freezes well, just be sure it is completely cooled and well wrapped before freezing.


Until next time, Eat well and Keep Digging!

The Gastronomic Gardener
Garden blog http://amidwestgarden.blogspot.com/
Cooking blog http://ihopeyouarehungry.blogspot.com/
Twitter - www.twitter.com/DavidPOffutt
http://www.facebook.com/TheGastronomicGardener

Monday, July 18, 2011

Grilled artichokes for Meatless Monday

On the way back from Guido's extraordinary garden, I stopped at the market for a chicken. But what caught my eye was the artichokes for 50 cents a piece. I picked up 4 and had visions of a summer delight.

Grilled artichokes,  for me it conjures an image of cobblestone streets and ancient stone houses, grizzled old men and women whose lives you can read in their weathered faces. Simple food, fresh in from the fields, a crusty bread and wine from the grapes down the road. Oh, where was I? Right, the suburbs of Chicago. Sigh.....

But I can still have grilled artichokes.


Ingredients:
4 artichokes trimmed
1/2 cup olive oil
2 cloves garlic minced
lemon juice


For the sauce (adapted from epicurious.com)
1/2 cup mayonnaise
3 tablespoons Worcestershire sauce
2 tablespoons olive oil
2 tablespoons oriental sesame oil
1 1/2 tablespoons honey
big splash lemon juice
3/4 teaspoon salt

Mix all together  in a bowl and refrigerate
For the artichokes,
Combine olive oil and minced garlic - set aside

Fill a  big pot with water, add a generous 1/2 cup lemon juice

Trim the artichokes, cutting off the top 1/4 and trimming the pointy leaves with kitchen shears.


Put  trimmed artichokes in lemon-watered pot. When finished with all the artichokes, drain all but the last 1" of water in the pot, remove the chokes, place a steamer insert, put the chokes back in, cover the pot with a lid, bring to a boil and steam for 10 minutes.

Cut into halves, then quarters. Use a spoon to remove the choke, it's the feathery bits above the top of the stem (the heart). Discard the choke. In the picture below the spoon is pointing at the bits to be removed.


Finish cleaning all the artichokes.


Prepare a grill to medium high heat. For the best flavor, I'd use lump wood charcoal, but as it was 95F out, I opted for just using the handy propane grill.

Put the artichokes on the grill and brush with the prepared garlic olive oil.


Grill until tender and artichoke have a bit of char on them. Plate and serve with Sesame dressing.
click on this picture


Under the  big sun umbrella, with my eyes closed, eating these with my fingers,  I am almost trasnsported.

Until next time, Eat Well & Keep Digging!

The Gastronomic Gardener
Garden blog http://amidwestgarden.blogspot.com/
Cooking blog http://ihopeyouarehungry.blogspot.com/
Twitter - www.twitter.com/DavidPOffutt
http://www.facebook.com/TheGastronomicGardener

Friday, July 15, 2011

First Pickles of the year

All the cucumbers I've been picking finally met their  destiny.


This isn't all of them, just the most recent pick. From the Ball Blue Book of Preserving, here's the recipe:

Ingredients:
4 lbs 4-6 inch cucumber cut into slices
2 lbs onions thinly sliced
1/3 cup pickling salt
2 cups sugar
1 tbs mustard seed
2 tsp turmeric
2 tsp celery seed ( I didn't have any so I left it out)
1 tsp ground ginger
1 tsp whole black peppercorns
3 cups vinegar

Slice up the cucumbers and onions into 1/4" slices.


Combine in a large bowl layering with the salt.

Cover with ice and let sit 1.5 - 2 hours.


Drain, rinse and drain again.

Combine remaining ingredients in large pot, bring to a boil.

Add drained cucumbers and onions, return to a boil.

Pack hot pickles and hot liquid into hot jars, leaving 1/4" head space. Remove air bubbles.

Adjust 2 piece caps. Process 10 minutes in a boiling water canner. The new 60,000 btu burner works wonders!


Remove from canner and place in cool spot away from drafts or temperature fluctuations. Here they are right out of the canner. The recipe indicates 7 pints but I never get what the recipe says, always 1 or 2 short. Doesn't matter if it's pickles or salsa; I'm always a few pints short of a full batch. ;)


When cool, check seal and label.

Allow 4 to 6 weeks for pickles to develop full flavor.

(DISCLAIMER: This is not step by step all inclusive instructions. If you choose to can produce or other foods, please get proper equipment and instructions and follow them to the letter. The risk of serious food borne illness is very real. Proceed at your own risk.) -


Until next time, Eat Well and Keep Digging!


The Gastronomic Gardener
Garden blog http://amidwestgarden.blogspot.com/
Cooking blog http://ihopeyouarehungry.blogspot.com/
Twitter - www.twitter.com/DavidPOffutt
http://www.facebook.com/TheGastronomicGardener

Monday, July 11, 2011

Meatless Monday - Garden Thai Curry

After last week's pork-fest, let's get back on track. The harvest in the garden is starting to come in, I was late getting home, so what to do. Just did a stir-fry, OK I'll make a curry.

It is completely flexible but here is what I did.

Ingredients


Coconut milk
Chili paste
Banana pepper (garden)
Spinach (garden)
Carrots (some from the garden)
Crooked neck squash (garden)
Tomatoes
Red Onion
Minced Garlic
Minced Ginger
Basil for garnish
Oil
Salt

Start  rice

Heat the oil in a wok
Add the garlic, ginger and chili paste, stir fry for 15 seconds
Add the coconut milk
Add the vegetables except for spinach.


Bring to a boil, reduce heat and cover.
Simmer gently until eggplant is tender.
Add spinach


Stir to combine.
Serve over rice, garnish with basil leaves.


Fast, simple and satisfying. And hot! - Adjust chili paste to your taste.

Until next time, Eat Well and Keep Digging!

The Gastronomic Gardener
Garden blog http://amidwestgarden.blogspot.com/
Cooking blog http://ihopeyouarehungry.blogspot.com/
Twitter - www.twitter.com/DavidPOffutt
http://www.facebook.com/TheGastronomicGardener

Saturday, July 9, 2011

Watermelon, Feta, Red Onion and Basil Salad with Balsamic Glaze

Of all the foods I associate with summer, watermelon takes the prize.  Crisp, sweet, running off your chin juicy, sitting on the back porch spitting seeds.... nothing brings me back to childhood summers like watermelon.

It's hot today, and I had a taste for watermelon, but not just a big wedge. A chilled watermelon was in the fridge so I decided to make the treat a little more grown up. It's super simple and you can modify it anyway you'd like. The title of the post says it all in terms of the ingredient list. If you don't have balsamic glaze you could make some by cooking down balsamic vinegar until thick.


Cut the watermelon however you'd like, crumble some feta, thinly slice the red onion, make a chiffonade of basil.

Add a drizzle of glaze  on the plate and assemble.


This was refreshing and elegant. Crisp watermelon , the salty tang of feta, the sharp bite of red onion, all pulled together by the silky sweetness of the balsamic glaze. The watermelon could have been darker red, but you never can tell what will be inside!

A great starter or a tasty light snack. Make this salad this summer!


Until next time, Eat Well & Keep Digging.


The Gastronomic Gardener
Garden blog http://amidwestgarden.blogspot.com/
Cooking blog http://ihopeyouarehungry.blogspot.com/
Twitter - www.twitter.com/DavidPOffutt
http://www.facebook.com/TheGastronomicGardener

Wednesday, July 6, 2011

Strawberry Cheescake Ice Cream

A holiday during the summer is a good excuse for a treat like ice cream. Inspired by John over at The Bartolini Kitchens, I decided to try my hand at this frozen delight over this past holiday weekend.

I've adapted the ice cream recipe from a no-cook recipe over at MyRecipes.com.

Ingredients:
Ice cream
1 14 oz can sweetened condensed milk chilled overnight
1 5oz can evaporated milk chilled overnight
2 tbs sugar
2 cups half and half
1/2 package of cheesecake pudding mix from prepackaged kit. - about 3.5 oz

1 graham cracker crust pie shell

For the Strawberry swirl:
1 1/4 cups fresh strawberries rough chopped

1/2 cup sugar
1 tbs cornstarch
1/2 cup water
1 tbs lemon juice
pinch of salt


Start with the swirl. This technique is straight from John.
In a small saucepan, combine sugar, salt, and cornstarch.
Gradually stir in water until smooth. Stir in strawberries and lemon juice.


Bring to a boil.


Reduce heat; simmer, uncovered, for 5 minutes or until slightly thickened, stirring occasionally.

Cover and refrigerate until chilled.

Puree before use.


For the ice cream combine all chilled ingredients in a bowl before pouring into the freezer container of 1 quart electric ice cream maker and freeze according to the manufacturer's instructions. (You're on your own on this one.)


Remove container with frozen ice cream and place in freezer for 15 minutes (next time I'll let it go 30 minutes). While ice cream rests, crumble the crust to the size/ consistency you want.


In an appropriate container, layer ice cream, graham cracker chunks and strawberry puree, repeat as many times as you have ingredients.


Stir a few times, enough to swirl but not so much that it is an even homogenized consistency.  Easier said than done, it probably would have helped if the ice cream were a little firmer. It was still pretty soupy. Ah well, I am sure it'll taste fine.


Cover and freeze for 1.5 hours or more. I checked it before bed, delicious but not quite there.  But later, after a day in the freezer, it's a work of art!  The crust somehow remains dry and crispy, the cream tastes of cheesecake and the strawberries - while not a swirl, are bright and fresh! And it's amazing what a sheet of black paper can do!


I look forward to trying this again!

Until next time, Eat Well and Keep Digging!

The Gastronomic Gardener
Garden blog http://amidwestgarden.blogspot.com/
Cooking blog http://ihopeyouarehungry.blogspot.com/
Twitter - www.twitter.com/DavidPOffutt
http://www.facebook.com/TheGastronomicGardener
Related Posts Plugin for WordPress, Blogger...