Wednesday, October 19, 2011

Moving to new digs

Perhaps you have noticed I've not been posting very much. Perhaps not. Truth is, I've been busy getting ready to move.

As with any great meal, at the end there is always clearing the table. It doesn't mean  there won't be another meal, just that this one is complete.

Almost two years ago, I started with two blogs, A Midwest Garden, and I Hope You Are Hungry. I have enjoyed every minute of every post, but at times found myself off track and off topic.

Later, I started a Facebook page under The Gastronomic Gardener name and the growth there has been gratifying albeit sporadic.
As my interests and focus has changed, I feel I have outgrown these platforms, so I am putting A Midwest Garden and I Hope You Are Hungry to bed.

Blogger has served me well, I’ve entered the world of blogging and made some new friends; but the meal is now at an end. It is time for me to bid farewell to Blogger. I look back and can see how far I've come in terms of quality content and photographs. It is a fine platform as thousands of fellow bloggers can attest. It is just time for me to move on.
But this is not goodbye – but rather, as I said above, a renewal!

I am happy to announce I am launching GastronomicGardener.com!


It combines content from both A Midwest Garden, and I Hope You Are Hungry. Series are in the works designed to help and encourage folks learn to garden as well as try out different techniques. There are plans for tools to help in garden planning, planting schedules, and more!
I look forward to sharing what I have learned, to continue learning from my readers and begin fresh with new focus and fervor!
Please join me over at GastronomicGardener.com! Take a look around and let me know what you think!

I’ll see you there.


David P. Offutt
The Gastronomic Gardener

Monday, September 26, 2011

An award from a fellow blogger

Recently I received an award from fellow blogger and Chicagoan ChgoJohn over at http://fromthebartolinikitchens.com/, a wonderful blog that chronicles the recipes and memories of an Italian family. Through John, I have come to appreciate the tradition of ice cream in his family, the sights, sounds and smells of family gatherings that while about the family, have a rich culinary tradition.


According to "Versy" tradition, I have to give thanks and a link back to the person who gave me this award. Thanks one more time John!

Next I am supposed to divulge seven (7) obscure facts about me.
1) I am the ninth of ten children. I still can hear my late mother calling out all the names until she got to the right one. I also hear her say "David Philip!" when I misbehave.
2) I was a bit of an athlete. I played American football until I realized I was too small and too slow, but I did like to run into people.
3) Continuing in that vein, I particpated in the 1992 Division III 3 Meter Springboard Championship (I came in 32nd as a college freshman)
4) I completed an 3 mile open water swim in less than 90 minutes within the last 5 years.
5) I smoked for more than 20 years. Glad I quit, but there are times....nah... not worth it.
6) I hate mint flavor. It's the only flavor I don't like.
7) I was born with a severely club left foot. Corrective surgery at 6 months old obviously turned out great, but I have one foot that is about 1.5" shorter than the other. Makes buying shoes an adventure. (Not really I just fit the bigger foot)

Here is here where I am supposed to nominate 15 other bloggers. I don't think I can do that as I don't really follow that many. I also need to check and see if they have already received  this award.

In no particular order:
http://marksvegplot.blogspot.com/ - Mark has a wonderful blog with oustanding pictures of his meticulous garden.  If you haven't been there - check him out!

http://adventuresinthegoodland.blogspot.com/ - Ohiofarmgirl is doing a great job and inspires me. She has cast off the corporate shackles and embraced the good life. Keep my spot warm, I'm headed ypur way when I get it worked out.

http://cowgirlscountry.blogspot.com/ - Cowgirl is another hero. Her down home skills are deceptive, she makes the subtle look simple. Once you've checked out her blog, you may go build a smoker. I know  I did!

http://annieskitchengarden.blogspot.com/ - Annie's Granny - friendly, supportive and a prodigious gardener. I don't know where she gets the energy - she can garden circles around me.

Please go visit them and tell'em I sent you!


Until next time, Eat Well & Keep Digging!

The Gastronomic Gardener
Garden blog http://amidwestgarden.blogspot.com/
Cooking blog http://ihopeyouarehungry.blogspot.com/
Twitter - @gastrogardener
http://www.facebook.com/TheGastronomicGardener
email: thegastronomicgardener at gmail dot com

Sunday, September 25, 2011

Jalapeno Hot Sauce - or What to do with a Pound of Ripe Jalapenos


Yesterday I picked about 75 ripe jalapeno and cherry bomb peppers. There is no way I'm going to be able to use all those peppers fresh, and since I use hot sauce very regularly, I decided to make my own.


Ingredients:
2 teaspoons vegetable oil
1 – 1.5 lbs (about 60-70) fresh ripe jalapeno peppers, sliced
6 cloves garlic, minced
1 cup minced onion
1 1/2 teaspoons salt
4 cups water
2 cups distilled white vinegar


Directions:
Prepare 1/2 pint canning jars per manufacturer's instructions.

Slice the peppers - wear gloves if desired.


In a non-reactive sauce pan over high heat, combine oil, peppers, garlic, onion and salt; saute for 5 minutes. Add the water and cook for 20 minutes, stirring often. You may wish to do this outdoors! Whew!


Remove from heat and allow mixture to cool to room temperature.


Transfer the mixture to a food processor and puree until smooth.


Strain liquid through a sieve into a clean saucepan, discarding solids. It's a pretty color!


Whisk in vinegar.

Return to a boil. Turn off heat.


Ladle hot sauce into a sterilized jars and adjust two piece lids. Process in hot water bath 15 minutes.


Since these are 8oz jars, when ready to use, I'll decant into a squeeze bottle to keep in the fridge.


Alternatively, skip the hot water bath and store in refrigerator up to 4 months.

This will heat things up!


Until next time, Eat Well & Keep Digging!


The Gastronomic Gardener
Garden blog http://amidwestgarden.blogspot.com/
Cooking blog http://ihopeyouarehungry.blogspot.com/
Twitter - @gastrogardener
http://www.facebook.com/TheGastronomicGardener
email: thegastronomicgardener at gmail dot com

Monday, September 12, 2011

Meatless Monday - Quick Tomato Sauce and Pappardelle

Recently I put up a few pints of Marinara sauce, and in the past I’ve made rich dark “gravy” thick with meat that sat burbling  for hours on a cold winter day.  I love the rich dark silky sauce and I will never tire of it.  

However, this is the time of being flush with tomatoes. With more than I can eat on salads,  have time to can, or find any victims to take them off my hands.

As opposed to the patient and sophisticated deep bass notes of a long simmered sauce, this sauce is brassy, loud and fresh as nineteen-year-old sailor on his first shore leave after three months at sea. 

Add a handful of pungent basil fresh from the garden, a sprig of oregano and a couple cloves of garlic roughly chopped and you have the makings of a quickly prepared, brightly flavored weeknight meal.
No careful measuring here, this is cooking by the seat of your pants, Pinot Noir in a coffee cup, roll up your sleeves, put Sinatra on the music player. Add a salad and enjoy! 


Ingredients:

1lb ripe tomatoes cored and roughly chopped
2 cloves garlic crushed then chopped
1 ripe jalapeno minced (optional)
Pinch crushed red pepper (optional)
1 handful fresh basil leaves – about a dozen - shredded or chiffonade
1 sprig fresh oregano
2-3 tablespoons olive oil
Big pinch salt
¼ cup gated parmesan divided
½ cup + of cooking water
Salt and pepper to taste
½ lb dried long pasta – I prefer Tagliatelle or Pappardelle

Directions:

Prepare  pasta according to directions
While water comes to a boil and pasta cooks…

In a large saucepan over medium high heat, add the olive oil and heat until shimmering

Add the chopped tomatoes, (jalapeno and red pepper) and toss to coat with oil,  add big pinch of salt

Cook, stirring often until tomatoes soften – about 3-5 minutes

Add garlic, basil and oregano, stir and turn heat down to medium

Continue cooking and stirring often until sauce starts to thicken, reduce heat to medium low

When pasta is just about cooked remove from cooking water and add to tomato mixture. Add ½ + cup of cooking water (add more or less according to how much liquid you want)  and combine, tossng until pasta is done.

Test for seasoning, adjust salt and pepper to taste.

Put sauced pasta in a bowl, top with parmesan, enjoy!


Until next time, Eat Well & Keep Digging!

The Gastronomic Gardener
Garden blog http://amidwestgarden.blogspot.com/
Cooking blog http://ihopeyouarehungry.blogspot.com/
Twitter - @gastrogardener
http://www.facebook.com/TheGastronomicGardener
email: thegastronomicgardener at gmail dot com

Sunday, September 11, 2011

Pickled Jalapenos

The Jalapenos have mostly ripened all at once. I can't use them all fresh and I do love pickled Jalapenos, so that's what I did, canning three pints. These should be nice bright spicy accents in a few weeks.
I tend to eat them right out of the jar, but they are good additions to other dishes as well.

Pickling peppers is easy - use equal amounts of vinegar and water, add a bit of salt, some pepper corns, bay leaf, sugar.

Makes 3 pints

Ingredients:
2 lbs of jalapenos, sliced about 1/3" thick
3 cups water
3 cups white vinegar
1 tablespoon pickling salt
1.5 teaspoons sugar
1 tablespoon black peppercorns
3 bay leaves
3 garlic cloves


Directions:
Prepare jars according to manufacturers instructions.

Combine all ingredients except peppers in a big pot. Bring to a boil, reduce heat and simmer 5 minutes.

Pack pepper slices into hot jars leaving 1/4" head space.

Ladle pickling liquid over peppers leaving 1/4" head space, wipe rims, adjust 2 piece caps and process 10 minutes in hot water canner.

After canning, allow flavors to develop a few weeks before using.


Until next time, Eat Well & Keep Digging!


The Gastronomic Gardener
Garden blog http://amidwestgarden.blogspot.com/
Cooking blog http://ihopeyouarehungry.blogspot.com/
Twitter - @gastrogardener
http://www.facebook.com/TheGastronomicGardener
email: thegastronomicgardener at gmail dot com

Monday, August 29, 2011

Meatless Monday - Pesto Risotto

It isn't always easy trying to figure out what to make for you on Mondays. There is always a little extra pressure to make something new and exciting and still be acceptable to the vegetarians in the group.

I was riding the train home from the city thinking about it and I have plenty of basil, besides a colleague from Germany prodded me the other day that I had not yet prepared a risotto, so Pesto Risotto seemed a natural fit. I also used some of the sweet butter I made back in March. I get excited when I'm dicing the shallots. "I'm cooking with shallots... that I grew!"  I didn't have any pine nuts  for the pesto so I substituted walnuts.

It turned out to be quite filling and good, the creamy base notes of risotto punctuated by the high notes of the basil and garlic. A lovely chord indeed!


Make the pesto first:

Ingredients:
3 cloves garlic
1/2 cup walnuts
1 teaspoon salt
1/2 teaspoon black pepper
3 cups loosely packed basil leaves
2/3 +/- olive oil

Directions:
Turn on food processor and drop in garlic. Process until finely chopped.
Turn it off, add the basil, cheese, salt, pepper, nuts.
Whizz until all is finely chopped, with motor running, add oil slowly until incorporated but not yet smooth.

Set aside.

Now the risotto:

Ingredients:
1.25 cups arborio rice
1.5 cups white wine
4 cups vegetable broth
4 tablespoons butter divided
1 tablespoon olive oil
2 small shallots finely diced
big pinch of salt
big pinch of grounf black pepper
1/4 cup grated Parmesano Romano
1/4 cup pesto
Basil to garnish

Directions:
In a medium pot over medium heat  add the wine and the broth.
Heat to simmer and then reduce heat to keep barely simmering

In a 4 quart pot, add two tablespoons butter and olive oil

When butter has melted, add the shallots and cook for three minutes until shallots are soft but not browned.

Add the rice and stir to coat with butter oil mixture, cook stirring constantly about 2 minutes.

Add 1/2 cup simmering wine broth mixture and cook - stirring until moisture is absorbed
Continue adding broth 1/2 cup at a time, stirring constantly until it is absorbed before adding next bit of broth.

Repeat until rice is tender, looks creamy but is still al dente - about 15 - 20 minutes

Stir in cheese, salt pepper and pesto.

Garnish with basil leaf and serve immediately. Add a side salad for a complete dinner.


Until next time, Eat Well & Keep Digging!

The Gastronomic Gardener
Garden blog http://amidwestgarden.blogspot.com/
Cooking blog http://ihopeyouarehungry.blogspot.com/
Twitter - @gastrogardener
http://www.facebook.com/TheGastronomicGardener
email: thegastronomicgardener at gmail dot com

Sunday, August 28, 2011

Canned Marinara

The Romas are finally starting to come in, but there is not enough for a huge batch of sauce. I did however find a recipe for Marinara that only calls of 8lbs of tomatoes.

*If you are not comfortable canning this, you could always freeze it.


Let's give it a go...


Makes 4+ pints

Ingredients:
8 lbs. ripe Roma (plum) tomatoes
1-1/3 cups onions, finely minced
2/3 cup celery, finely minced
3 cloves garlic finely minced
1-1/3 cups carrots finely minced
2/3 cup olive oil
1-1/4 teaspoon sugar
1/8 teaspoon black pepper
1 tablespoon dried basil
1 teaspoon dried oregano
Salt to taste

Directions:
Prepare 4 glass pint canning jars, lids and bands

Peel Tomatoes
Drop tomatoes into boiling water, a few at a time.
Let the water return to a boil, then remove the tomatoes and drain. Peel and chop.

In a large pot, cook the onion, garlic, celery, and carrots in the olive oil, covered over medium-low heat for about 15 minutes, stirring a few times.

Uncover and stir over heat for 5-10 minutes longer, or until the vegetables are very soft and a little gold.

Add the tomatoes, sugar, and pepper and simmer gently, covered for 15 minutes.


Puree the sauce through the medium disc of food mill. You could used a food processor and run through a fine colander


Return to pot, add basil and oregano,  cook at a simmer until desired consistency is reached, about 20-40 minutes, stirring often.

Add salt to taste. If you prefer a smooth sauce, work the sauce through the fine disc of a food mill.  


Ladle hot sauce into prepared hot jars leaving 1/2 inch headspace.
Remove air bubbles.

Wipe rim.

Center hot lid on jar. Apply band and adjust until finger tight.

Process jars in a boiling water canner for 35 minutes, adjusting for altitude.

Remove jars and cool. Use in the dead of winter, think of the warmer months, and smile!


Until next time, Eat Well & Keep Digging!


The Gastronomic Gardener
Garden blog http://amidwestgarden.blogspot.com/
Cooking blog http://ihopeyouarehungry.blogspot.com/
Twitter - @gastrogardener
http://www.facebook.com/TheGastronomicGardener
email: thegastronomicgardener at gmail dot com

Friday, August 26, 2011

Bibimbap - a colorful Korean feast!

I've been wanting to make Bibimbap for a while now. It's easy to make, it is pretty to look at, and it is delicious!

Bibimbap is a traditional Korean dish, whose name means "mixed meal." A scoop of steamed white rice is surrounded by colorful items (meat optional), topped with a raw or fried egg. You stir it all up and get busy eating.

For this I used the following items from the garden: chard, peppers, greenbeans, baby crooked neck squash.  This is a felxible dish, I suspect each family has their own way of making it and Grandma's was probably the best.

Bibimbap
Serves 2 -  prep time 20 minutes
Ingredients:
white rice
2 eggs
1 cup green beans julienned
1/2 cup pickled gingered carrots - or 1 medium carrot julienned
baby lettuce or "mixed greens"
1 small red pepper - julienned
1 cup julienned mushrooms ( I used beautiful oyster mushrooms from the farmers market)
1 cup julienned summer squash or zucchini
1 rib of celery sliced thin
1 cup cooked meat ( ground beef or pork, shrimp or chicken. I used some spicy merguez) (Optional)
1 -2 cups chopped Swiss chard (or spinach)
Garlic Chili paste
vegetable oil for cooking
sesame oil

Directions:
Cook  rice according to directions

While the rice cooks,

In a saute pan, over medium high heat, add a scant tablespoon of oil  a couple drops of sesame oil and quickly saute  one vegetable at a time - the peppers, green beans, mushrooms, squash or zucchini, celery, chard or spinach, removing to plate, and adding oil as needed. If using pickled carrot, do not saute them. Don't cook the lettuce

Keep the cooked vegetables separate.

Fry eggs, one at a time, reserve.

To assemble the dish, place a scoop of white rice in the middle of a bowl, arrange all the vegetables and meat around the rice, top with the fried egg. Add a generous tablespoon of garlic chili paste and serve.

It's gorgeous isn't it? Stir it all up and enjoy!


The crunchy pickled carrots and celery play nicely with meaty mushrooms, fiery sausage and garlic chili paste. This dish is light enough for a hot summer night, yet satisfying as well. I'm looking forward to making it again!

Until next time, Eat Well & Keep Digging!

The Gastronomic Gardener
Garden blog http://amidwestgarden.blogspot.com/
Cooking blog http://ihopeyouarehungry.blogspot.com/
Twitter - @gastrogardener
http://www.facebook.com/TheGastronomicGardener
email: thegastronomicgardener at gmail dot com

Wednesday, August 24, 2011

Seven Links Challenge

The Gauntlet has been thrown my way. ChgoJohn, over at the wonderful Wordpress blog from the Bartolini kitchens has issued me  the Seven Links Challenge.

This is an interesting challenge in that it invites introspection. I’ve been blogging since June of 2010 and only have 173 posts. So I really consider myself a newbie. But John issued the challenge, and I’m taking a break from weeding (it’s a jungle out there) so away we go....

Most Popular Post
By far the most popular post has no food in it at all. It is part one of the cold smoker build. Why part two doesn’t have the same amount of action I don’t know. Did people fall asleep? Get discouraged? I had a great time on the build and am looking forward to firing it up once the weather cools. It works very well and offers a good excuse to spend many hours outside when it is cold. Kinda like ice fishing without the ice.

Most Controversial Post
This is a tough one because for the most part people have been very supportive here. One of my early posts generated a bit of a stink when I cross-posted to The Gastronomic Gardener Facebook page. Of all things it was grilled baby octopus. I was accused of eating the “cute little” octopus, and ravaging the oceans natural resources. I felt compelled to respond about the status of octopus as a food source. Interestingly, one of the folks who squawked and was then rebuffed, has become a regular follower to this day.

Most Helpful Post

Helpful to who? To me? To the readers? Hard to say. I’ll go with From Humble Beginnings, because it validates that it is not the kitchen that makes good food but rather the passion of the cook combined with the quality of the ingredients. It also seemed to resonate with my readers.

Most Beautiful Post

Golly, how to define beautiful? Pretty pictures? I’ve come a long way in a short time but there is still so much to do to improve my photographs. I don’t have an expensive setup or camera or any training. I also don’t shoot a ton of pictures. That’s my dinner getting cold! That said, I will only take into consideration the final plate as the prep shots seem to not be of the highest quality. After all that, I have to go with the Pork Belly Confit Tacos. The “money shot” is awesome. Natural lighting helps a lot!

Most Surprisingly Successful Post The Pan Fried Tilapia with lemon butter caper sauce continues to do well. I think it is because tilapia is such a ubiquitous fish, and heck, who doesn’t like lemon butter

Most Under-Rated Post

Chickpeas are one of my favorites and I use them often. For the under-rated category I will go with the Falafel post for Meatless Monday, this combined both labneh and falafel from scratch. It was delicious and only provoked one comment.

Most Proud of Post

I love all my posts, and how do I choose the one of which I am most proud? Is it the first one, where I finally committed to starting this journey? The last one where I demonstrate my ongoing commitment? I think I’ll pick the Pastrami how-to post. The final product, a simple pastrami sandwich, homemade from the pastrami, to the bread down to the mustard. It was as close to perfection as I have come.

Thanks ChgoJohn! Now I have to pick some victims. Who shall it be?

I choose:

Mark’s Veg Plot
Adventures in the Good Land
Cowgirls Country Life
Simple Self Sufficiency


Until next time, Eat Well & Keep Digging!

The Gastronomic Gardener
Garden blog http://amidwestgarden.blogspot.com/
Cooking blog http://ihopeyouarehungry.blogspot.com/
Twitter - @gastrogardener
http://www.facebook.com/TheGastronomicGardener
email: thegastronomicgardener at gmail dot com

Monday, August 22, 2011

Meatless Monday - Ratatouille

I've made this before but my recent harvests rather demand it. One keen eyed observer even predicted it! But with tomatoes, peppers, onions, eggplant, crooked neck squash, basil and parsley all from the garden it would be harder to justify not making it rather than repeating from a year ago.

I follow the suggestion from the  Gourmet cookbook and cook the components separately before combining them for a final simmer. The results are worth it!

Ratatouille
Ingredients:
2-3 pounds of tomatoes roughly chopped - If you want you can peel them first, but I don't bother
2 big onions sliced thinly
2 lbs each of zucchini and eggplant cut into bite size chunks - I used crooked neck squash instead of zucchini
3 bell peppers, seeded and cut into 1" chunks
1 cup chopped flat leaf parsley
1 handful of basil leaves torn in half - about 20
6-10 cloves garlic thinly sliced
1+ cup olive oil
1/2 teaspoon  fresh ground pepper
salt

Directions:
In a large pot over medium heat, add the chopped tomatoes, garlic, parsley and basil and 1/3 cup of olive oil. Bring to a simmer and cover. Simmer about 30 minutes until the tomatoes break down.

Meanwhile.... put the eggplant in a colander and sprinkle with salt. Place over a pan or in the sink while it drains.

In a big saute pan heat 3 tbs olive oil. Add the onions and a pinch of salt, cook until soft - about 10 minutes  - remove to a bowl with a slotted spoon.


Repeat procedure with peppers, crooked neck squash (or zucchini) adding olive oil and salt each time.


Finally, blot dry the eggplant, add another 3 tbs of olive oil (no salt) and the eggplant - cook until soft about 10-12 minutes.

Add all the cooked vegetables and black pepper to the simmering tomatoes. Simmer for another hour or so until the vegetables are very tender.

Taste and adjust the salt and pepper as needed.

Serve hot, warm or room temperature with some crusty bread. It's like summer in a bowl!


Until next time, Eat Well & Keep Digging! 

The Gastronomic Gardener
Garden blog http://amidwestgarden.blogspot.com/
Cooking blog http://ihopeyouarehungry.blogspot.com/
Twitter - @gastrogardener
http://www.facebook.com/TheGastronomicGardener
email: thegastronomicgardener at gmail dot com

Sunday, August 21, 2011

Trio of Grilled Fruit

This time of year fruit takes on an important role in the kitchen. Cool fruit salads, jellies and jams are the norm. But what some folks don't realize is fruit can be satisfyingly grilled for a unique approach to desserts.  One thing to note about grilling fruit: this is one situation where slightly unripe fruit is OK. Grilling will soften and sweeten the fruit.

I will  do a trio as they are quick and simple, yet deeply satisfying.

Let's start with Grilled Figs with Honey Yogurt. I learned this year that figs can be successfully grown here in Zone 5. It's on the list of things to try for next growing season.

Grilled Figs with Honey Yogurt and Walnuts
Ingredients:
10+  fresh figs halved
1+ tablespoon brown sugar
1/2 cup plain Greek yogurt
1 tablespoon honey
walnut halves - enough to top each fig half

Directions:
Heat grill to medium.
Sprinkle brown sugar over cut side of figs
Put figs on grill, if needed use foil or a screen or one of those grilling things that has the holes so figs don't fall through.
While figs grill, stir honey into yogurt.

Remove figs from heat, top with honey yogurt mixture and half a walnut.

For the next one it doesn't get any easier. Grilled peaches. It tastes like pie!

Grilled Peaches
Ingredients:
3 peaches halved
1/2 tablespoon canola oil (not olive)

Directions:
Preheat the grill.
Brush the cut peach halves with the oil
Place the oiled peach half  cut side down on the grill
Grill for 3 minutes and turn 90 degrees
Grill another 3 minutes
Turn cut side up and grill another 3 minutes.  You don't want them turned to mush.


And finally, grilled strawberries. For this you let them mascerate a few minutes before grilling.

Grilled Strawberries
Ingredients:
1 lb strawberries hulled and sliced
1 tbs red wine
1 tbs balsamic vinegar
1 tbs brown sugar
Toasted pound cake

Directions:
Combine all ingredients except cake in a bowl, toss to combine.
Let stand 10-20 minutes.

Grill on the same grate that you grilled the figs on. It won't take long, about 3-4 minutes.

Spoon over toasted pound cake.

This trio makes a delicious dessert.


Don't be afraid to grill your fruit!

Until next time, Eat Well & Keep Digging!

The Gastronomic Gardener
Garden blog http://amidwestgarden.blogspot.com/
Cooking blog http://ihopeyouarehungry.blogspot.com/
Twitter - @gastrogardener
http://www.facebook.com/TheGastronomicGardener
email: thegastronomicgardener at gmail dot com

Monday, August 15, 2011

Meatless Monday - "Ratatouille" Panini

This time of year is great with all the produce in the garden or farmers market. One of my favorite things to make is ratatouille, that delicious vegetable stew featuring eggplant, zucchini, and tomatoes.

I had picked up some nice bread at the market, and thought, why not use those same flavors and make a sandwich, a toasted sandwich. A Ratatouille Panini!

Here in the States panini is used to denote a grilled sandwich, but the word comes from the Italian panino, meaning little roll. Panini is the plural form. So while the word is bastardized here in North America, it conjures an image of toasty crusty crunchy deliciousness. And when the stars of the sandwich come from your own garden? Well, it is only so much the better! I won't give exact measurements since I don't know how big you want your sandwich, and, being a sandwich it is a highly flexible "recipe." See what's fresh and take it from there!

Here's what I did.


Ingredients:
Good bread
2-3 Tomatoes sliced 1/3" thick
Eggplant sliced into rounds
Zucchini sliced into rounds
Bell pepper, preferably red or yellow sliced into sections
2 Garlic bulbs, separated into cloves and peeled
olive oil
Herbs de Provence
salt
softened goat cheese (optional)
Rosemary sprigs (optional)

Directions:
In a small sauce pan add garlic cloves and rosemary. Add enough olive oil to cover. Cook over very low heat, don't boil. Simmer for about an hour. When the garlic cloves are very tender, remove from heat and let cool.


While garlic poaches, prepare the vegetables.

Preheat oven to 225-250F.

Put cut vegetables on cooling rack over a cookie sheet, sprinkle eggplant and zucchini with salt to draw out moisture. Allow to sit for 30 minutes, blot moisture with paper towel. Turn the vegetables over and repeat the process.

Sprinkle the vegetables with the Herbs de Provence.

Put vegetables in slow oven until tender and slightly dry. Check at 1 hour, then every 30 minutes after that.


Here's what I had after the slow roasting.


I have and used a panini press but you could use a ribbed skillet or even a grill outdoors. Work with what you have.

Remove the garlic cloves from the oil.

Grill the vegetables (except the tomatoes, they will bee too delicate) brushing with the garlic infused oil.


Assemble the sandwich.  Smear the tender garlic onto one side of one of the pieces of bread.  Smear the other piece with the goat cheese. These are the inside part of the sandwich.

Layer the vegetables onto one of the pieces of bread.


Put the other piece of bread on top. Brush the top with a generous amount of the garlic infused oil. Put the  sandwich oiled side down on the panini press or skillet or whatever you are using. Oil the other side.

Grill until toasty and starting to char in spots.  Remove from press and allow to cool slightly before cutting in two. This  served two.

It was absolutely delicous, crunchy bread, tender vegetables, the garlic mellowed by poaching. A perfect summer dinner.


What vegetables do you have on hand?

Until next time, Eat Well & Keep Digging!


The Gastronomic Gardener
Garden blog http://amidwestgarden.blogspot.com/
Cooking blog http://ihopeyouarehungry.blogspot.com/
Twitter - @gastrogardener
http://www.facebook.com/TheGastronomicGardener
email: thegastronomicgardener at gmail dot com

Sunday, August 14, 2011

Pickled Gingered Carrots

Last week I was tucking into some bibimbap (a lovely light Korean dish heavy on vegetables) for lunch and the ingredient that struck me the most was the pickled ginger carrots. Crisp, cool, refreshing. I decided to see if I could recreate them. Some searching around led me to a few recipes.  This one is adapted from one that was 1/2 carrot 1/2 daikon radish. I used a bit more ginger and only carrots. I used a mandolin for part of it, but since these are cut lengthwise, I used a knife to finish them. Don't get me started on how I lost a big chunk of thumb to a mandolin some years back. 

Makes 5 pints.

Ingredients:
4 lbs. carrots peeled and julienned lengthwise in long strips
3 cups white vinegar
3 cups water
1 ½ cups sugar
2-3 tablespoons grated fresh ginger
6 jalapeno pepper (optional)

Directions:
Prep hot water canning bath and prepare your jars and lids.

Wash, peel and julienne carrots into long strips. 4 lbs may take a while, take your time and be careful!

In big sauce pan add water, vinegar, sugar and ginger.

Bring to a boil over medium heat and stir until sugar dissolves.

Add julienned carrots, stir and immediately turn the  heat off.

Place a pepper in each jar (if using).

Pack carrots into hot jars.

Ladle hot pickling liquid into jars, leaving ½ inch of headroom. Remove air bubbles and adjust head-space adding more liquid if needed.  

Wipe jar rims and add lids and bands.

Process for 20 minutes (timed from the boil). Let cool undisturbed for 24 hours.


I'm going to let these rest for a few weeks before using in my own bibimbap. I also foresee them being a great addition to any salad or adding a nice crunch to a sandwich. Stay Tuned!

Until next time, Eat Well & Keep Digging! 

The Gastronomic Gardener
Garden blog http://amidwestgarden.blogspot.com/
Cooking blog http://ihopeyouarehungry.blogspot.com/
Twitter - www.twitter.com/gastrogardener
http://www.facebook.com/TheGastronomicGardener
email: thegastronomicgardener at gmail dot com

Monday, August 8, 2011

Meatless Monday - Summer Squash Soup


I am one of the fortunate ones. I only planted one each of Crooked Neck Squash and Zucchini. I have only slightly more than I can use and haven't resorted to dastardly ditch and dash tactics on my neighbors. Yet.  But I have to stay on top of it, checking them for size everyday, and harvesting them before they resemble a weapon of mass gustation.

I've made winter squash soup many times, but not summer squash soup. How will it turn out?  It was great, and I used the squash, shallots, carrots and fresh herbs from the garden.

An immersion blender purees this soup nicely, but you could use a standard blender as well. Be careful when blending hot liquids!

Summer Squash Soup

Ingredients:
4-6 cups rough diced  summer squash - crooked neck, zucchini, whatever you have on hand.
2 small shallots chopped
2 small carrots (or 1 large) chopped
1 small hot chili (optional)
1-2 tbs olive oil
4 cups or more of vegetable stock (enough to barely cover the squash in the pot)
1 tbs basil chopped
1 tsp oregano chopped
Salt & pepper to taste
Sour cream (optional)


Directions:
Prep all the vegetables.

Put a soup pot over medium high heat. Add olive oil.

Add shallots, carrots (and chili)  to oil, cook stirring often for about 3 minutes, until shallots are translucent but not browned. Add a generous pinch of salt.


Add squash and continue to cook about 5 minutes.

Add enough vegetable broth to just cover the  squash.  Bring to a boil, then reduce heat and simmer for about 1/2 hour or until the carrots are very tender.

Remove from heat, add basil and oregano.

Using the immersion blender, blend the squash/broth mixture until smooth. If using a regular blender work in batches, moving blended soup to another pot.

Check and adjust seasonings. It took a bit of salt.

Serve with crusty bread, a dollop of sour cream (or plain yogurt), garnish with basil leaves.


This was quite delicious! I'm pretty sure it would be good chilled as well. It is surprisingly thick without the use of any extra starches. Next time I think a little lemon zest, and a squeeze of lemon will be added. My second (!) bowl I added a dash of vinegar, and it was a wise addition.

Give this a try!

Until next time, Eat Well & Keep Digging!

The Gastronomic Gardener
Garden blog http://amidwestgarden.blogspot.com/
Cooking blog http://ihopeyouarehungry.blogspot.com/
Twitter - www.twitter.com/DavidPOffutt
http://www.facebook.com/TheGastronomicGardener
email: thegastronomicgardener at gmail dot com

Wednesday, August 3, 2011

Dill pickles

The other day while I was smoking some pork butts for BBQ I had some time on my hands as well as about 5 lbs of cucumbers. I've made sweet pickles, I've made relish. Dill pickles would round out my pickle storage requirements. I used the recipe right out of the Ball Blue Book.


While I didn't have as many pickles as suggested for the recipe I figured if I had a little extra pickling liquid that would be OK. It's very inexpensive.


Ingredients:
8 lbs 4-6 inch cucumbers split
3/4 cup sugar
1/2 cup canning salt
1 quart each: vinegar, water
3 TBS mixed pickling spices
dill
garlic (1 clove per jar)
Jalapenos - 1/2 per jar

Directions:
Wash cucumbers, drain.
Split lengthwise and trim off a little the blossom end. (I ended up quartering them to fit the jars better)
Combine, sugar, salt, vinegar and water in a large sauce pot.
Tie spices in a spice bag (I used cheese cloth), add spice bag to vinegar mixture.
Bring to boil then simmer for 15 minutes.
Pack cucumbers into sterile jars, add jalapeno slice, dill and clove of garlic to each jar.
Ladle pickling liquid over cucumbers leaving 1/4" head space.
Adjust two piece caps. Process pints and quarts 15 minutes in boiling water canner.

I got 6 pints out of this and maybe a cup of left over pickling liquid. Incidentally, this was the first canning I've done where a jar didn't seal.  That's OK, it's in the fridge and I'll eat them up soon!


Until next time, Eat Well & Keep Digging!

The Gastronomic Gardener
Garden blog http://amidwestgarden.blogspot.com/
Cooking blog http://ihopeyouarehungry.blogspot.com/
Twitter - www.twitter.com/DavidPOffutt
http://www.facebook.com/TheGastronomicGardener
email: thegastronomicgardener at gmail dot com

Monday, August 1, 2011

Meatless Monday - Veggie Saute and Pasta

This time of year there is no excuse not to go meatless at least once a week. The produce is popping and whether at the farmers market or in your own garden, NOW is the time to take advantage of the bounty of the season.

With such pristine ingredients, I want to do as little as possible to them, and present them simply. In this case simple is good.


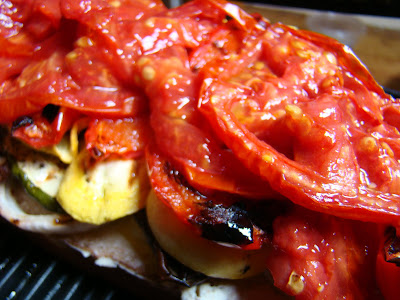
Crooked neck squash, zucchini, chilies, shallots, tomatoes and basil from the garden.

Garlic, olive oil, pasta, pecorino romano, salt and pepper from the larder.
A little boiled water, some hot oil and dinner is ready in 18 minutes. Feels good doesn't it?


Quick, light and delicious. Perfect for a weekday meal.

Until next time, Eat Well & Keep Digging!

The Gastronomic Gardener
Garden blog http://amidwestgarden.blogspot.com/
Cooking blog http://ihopeyouarehungry.blogspot.com/
Twitter - www.twitter.com/DavidPOffutt
http://www.facebook.com/TheGastronomicGardener
email: thegastronomicgardener at gmail dot com

Sunday, July 31, 2011

Carolina style Pulled Pork 'n slaw

What's going to make it Carolina style you ask? For one thing it's the sauce, BBQ sauces are highly regional, and even in North Carolina there are different favorites. I made a simple one, but boy is it good. Read on for the recipe.  Also making this "Carolina style" is the Red Slaw. That recipe is also below. My mouth is watering, and I just had it!


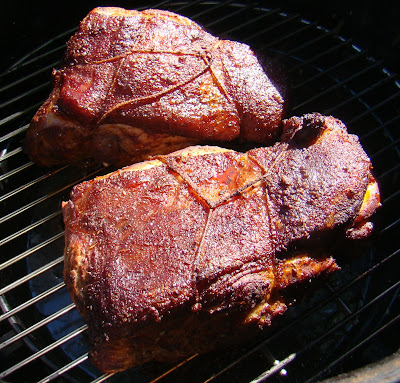
About 4 hours in I removed the lid to add the chicken (a different post in the works). They are definitely getting there!


After 7 hours


++++++++++++++++++++++++
While that was cooking I made  a Carolina "Red" slaw from this month's Saveur magazine (issue 139). It is pretty spicy.

Lexington-Style Red Slaw

Ingredients:
2/3 cup ketchup
1/2 cup apple cider vinegar
1/2 cup sugar
2 tsp hot sauce
2 tsp kosher salt
2 tsp ground black pepper
1 medium head of cabbage cored and finely chopped

Directions:
In a large bowl whisk together all ingredients except cabbage.
Add cabbage and toss to combine.
Allow to rest for 20 minutes, tossing occasionally.

Chill.

++++++++++++++++++++++++++++

I also made a super simple BBQ sauce appropriate to Carolina. It's not a thick sweet sauce that is favored in the U.S. Midwest, rather a tart/sweet thin sauce. (Before you jump all over me, there a million variations of this, I'm sure they are all good)

Simple Carolina BBQ sauce
Ingredients:
1 cup each - Ketchup, water, cider vinegar, sugar
1 big pinch of crushed red pepper

Directions
Combine all ingredients in a medium sauce pan, bring to a boil, then simmer 10 minutes.
Remove from heat, allow to come to room temperature then chill.
++++++++++++++++++++

At this point I chopped the pork. Normally I would pull it but I was in a hurry. I made way more than I can use but it does freeze very well, and I'll give some to some friends.


Now what I needed dinner! So here it is...


That plate lasted about 5 minutes.  Two recipes in one post, not a bad deal.

Until next time, Eat Well & Keep Digging!

The Gastronomic Gardener
Garden blog http://amidwestgarden.blogspot.com/
Cooking blog http://ihopeyouarehungry.blogspot.com/
Twitter - www.twitter.com/DavidPOffutt
http://www.facebook.com/TheGastronomicGardener
email: thegastronomicgardener at gmail dot com
Related Posts Plugin for WordPress, Blogger...