Friday, December 31, 2010

Canadian Bacon - step-by-step

Continuing my love affair with pork, curing, and smoking, I decided to start some Canadian bacon so the pastrami will not get lonely in the smoker on Sunday.

Like the pastrami, this will be cured in a brine:

1 Gallon water
1 1/2 cups kosher salt
1 cup sugar
1 1/2oz cure
1 large bunch sage (from the garden, I love that it is still green)
2 gloves of garlic peeled and lightly smashed

Combine all ingredients in a large pot and bring to a simmer, stirring to dissolve the salt and sugar.


Meanwhile trim the fat from a pork loin. 


Let brine cool to room temperature, then chill (outside works perfectly today) until cold.

Add the brine to the loin in a nonreactive container. Submerge the loin - using a plate as needed to weigh it down. Refrigerate for 48 hours.

Remove the loin from the brine, rinse under cold water and pat it dry. You can see some of the deeper red color from the cure, you'll see more once we heat it up.


Put on a rack over a tray and refrigerate, uncovered for 12-24 hours.

At this point the recipe call for a hot smoke but I will cold smoke it, then finish in the same slow oven as the pastrami.

In the smoker... (with pastrami and the duck breasts)


After 6 hours out of the smoker.


Ready for the slow (275F) oven to finish cooking. The color change should be dramatic if cured properly.


Out of the oven. Beautiful color, it tightened up a lot. This thing is a brick.


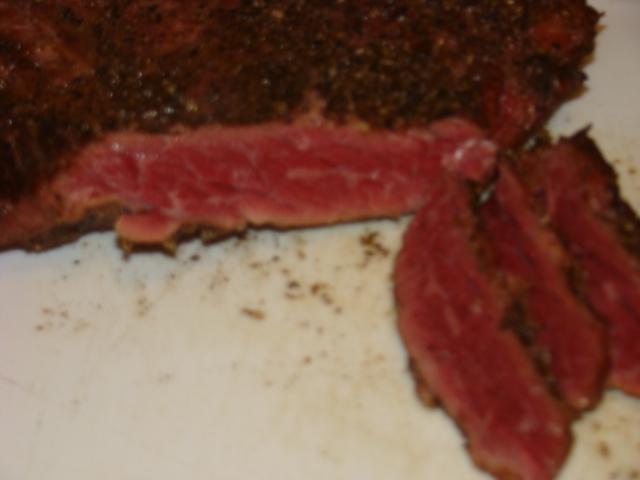
Have to have a taste.- As you might suspect the end pieces will be somewhat salty, but the flavor is great. This is so easy, just takes time.


The next morning sliced it up for packaging in six slice packs. Headed to the freezer, but not before we do a final taste test.


Where it all comes together!


Until next time, Eat Well & Keep Digging!


The Gastronomic Gardener

Duck Proscuitto Step by Step

This one looked very easy, duck breasts, salt, and time. Just thinking about thin slices arranged around a plate, shaved Parmesan, and a light tossed salad makes me want to make it.

Here's what I did.

Ingredients:
Kosher Salt - a lot, (no pun intended)  about  4 cups.
4 duck breasts with skin and fat

Rinse and pat dry the duck breasts.


In a non reactive pan (I lined a half sheet pan with plastic wrap) put down a layer a layer a salt.


Next, nestle the breasts, skin side up close - but not touching on the bed of salt.


Cover with salt completely.


Wrap with plastic wrap and and refrigerate for 24 hours.
Remove the  duck from the salt, discard the salt and rinse thoroughly. Pat completely dry with paper towels.


Per the book, "The flesh should feel dense, and it's color will have deepened." Indeed!

Dust both sides with white pepper.


Wrap each breast in cheese cloth and tie with a string. Hang in a cool  humid place ( I'll use the basement)  for about 7 days.


I'm going to diverge for two of the breasts and cold smoke them with the pastrami and Canadian bacon before returning them to their place in the basement.


Into the smoker for 4 hours.


Out of the smoker.


Re-wrapped and ready to join the others hanging in the cool basement.


After 8 days, only one breast seems ready. The other two need a day or two more. But let's get back to the one that is ready. The brown on the string is from the smoke.


Unwrapped. It is firm but not hard.


Slice on a bias with a sharp knife. A lovely color, and a sheen of luscious fat.


Homemade duck breast proscuitto, baguette, arugula salad, shaved Cravero Parmigiano Reggiano, olive oil and balsamic reduction.


Are you kidding me?  Salty, toothsome, silky. Wow!

Make this now! It is so easy. Duck + salt + time = pure deliciousness.

Until next time, Eat Well & Keep Digging!


The Gastronomic Gardener
Garden blog http://amidwestgarden.blogspot.com/
Cooking blog http://ihopeyouarehungry.blogspot.com/
Twitter - www.twitter.com/DavidPOffutt
http://www.facebook.com/TheGastronomicGardener

Braised beef short ribs

I had picked up a small package of beef short ribs, intending to make Korean BBQ, but wasn't paying enough attention. They were indeed short ribs but cut incorrectly for the BBQ recipe.  You can even see from the picture I was preparing to document the recipe which calls for a dusting of sugar before marinating.


So what to do with a thick tough cut of meat? Braise it of course. Seems like in winter it is perfect to have a rich meat simmering on the stove for hours, perfuming the house.

Ingredients:
2 lbs short ribs cut between the ribs
2 tbs  seasoned flour
2 tbs oil
4 cups beef stock
1 cup red wine (optional)
1  large onion peeled and sliced
1 cup chopped carrots
1 stalk celery chopped
2 cloves garlic peeled and lightly crushed
1 sprig rosemary
Green onion for garnish
Salt and pepper to taste

Directions:
Dredge rib sections in seasoned flour
Add oil to heavy pan or dutch oven over medium heat
Brown the meat on all sides, remove from pan,
Add vegetables and cook stirring often about 5 minutes.
Increase heat to high and add 1 cup of stock,
Bring to a boil, stirring up any brown bits that have stuck to the bottom of the pan.
Add remaining stock and wine, bring to a boil
Return browned meat and any juices back into pan.
Add herbs
Reduce heat and cover.
Simmer for 3-5 hours until meat is very tender.
Check and adjust seasonings.
Serve over potatoes, polenta, or noodles.

You could strain and thicken the sauce at the last moment but I wanted to leave it thinner.


Until next time, Eat Well & Keep Digging!


The Gastronomic Gardener
Garden blog http://amidwestgarden.blogspot.com/
Cooking blog http://ihopeyouarehungry.blogspot.com/
Twitter - www.twitter.com/DavidPOffutt
http://www.facebook.com/TheGastronomicGardener

Thursday, December 30, 2010

Homemade mustard

It really doesn't get easier than this, but who takes the (very brief) time to do this? I'm making the mustard in preparation for a lovely pastrami sandwich.   I'm dreaming of home cured and smoked pastrami piled high on homemade rye bread with a thick smear of homemade mustard.

But I digress....

A couple thoughts, try to get your mustard seed from a small market and not in the cute little jar that costs an arm and a leg.

Ingredients:
1/2 cup whole mustard seed
1/2 tsp turmeric
1/2  heaping tsp ground mustard
1/2 cup cold water
1/2 cup vinegar ( I used cider vinegar)
a squirt of honey


Grind the mustard seed  coarsely. I used a coffee grinder I use for spices.

Combine the ground seed, the mustard powder and the turmeric.


Combine the water and vinegar. Add to the dry ingredients, add a squirt of honey and stir well to combine.


It may seem a little too wet, but the seed will absorb the moisture as it rests.

Give it a taste, it is pretty darn hot right now but should mellow after a day or two in the fridge.

That's it. Simple huh?

Now back to dreaming about that sandwich.....

I did add another squirt of honey and whizzed it in the food processor after 3 days. It has mellowed and is quite delicious!


Until next time, Eat Well & Keep Digging!


The Gastronomic Gardener
Garden blog http://amidwestgarden.blogspot.com/
Cooking blog http://ihopeyouarehungry.blogspot.com/
Twitter - www.twitter.com/DavidPOffutt
http://www.facebook.com/TheGastronomicGardener

Wednesday, December 29, 2010

Pastrami step by step

I am hopping around in the Charcuterie book, having done bacon and  now setting off on a Pastrami adventure. I am picking these recipes to get started as they are seem easy and I like the end product.

Thin sliced Pastrami on rye, with dark mustard. Sounds delicious!

Pastrami is a close cousin to corned beef, the main difference is once it is cured, it is heavily seasoned then smoked prior to steaming, while corned beef is often boiled. But the beginning steps are the same.

Brisket is the preferred cut. From what I've read the point is preferred for corned beef and the flat for the pastrami but perhaps I got that backwards. In any event I trimmed the brisket into two cuts removing almost 2 lbs of fat.

Here is the cut I brought home.


And after broken down to two cuts.


Now the cure. If you're following along, the bacon was a dry rub and the porkbelly gave up it's liquid to form a brine. It also took an excruciating week of waiting. This time we'll make a brine and the curing will be down to 4 days.

For the brine (page 91 of Charcuterie):
1 gallon water
1 1/2 cups kosher salt
1 cup sugar
1 1/2 oz pink salt
1 Tbs pickling spices
1/2 cup packed brown sugar
1/4 cup honey
5 garlic cloves minced

Combine all brine ingredients in a big pot,


bring to a simmer, stir until salt and sugar disolve.


Remove from heat, allow to cool to room temp then refrigerate until chilled.

Add the beef to your container, pour brine over the top to completely cover, use a plate to weigh it down.

Now into the fridge for 3-4 days (I'll do 4 so I can smoke on Sunday at it looks like a good day weather-wise).


We'll be back soon to continue the process.

A week later, we remove the meat from the brine rinse it off.


A rub is prepared with:

1 Tbs each lightly toasted black pepper corns and whole coriander


Toast the seeds in a pan over medium heat, swirling until fragrant. Grind in a grinder.

Cover the meat with the ground spices and  refrigerate over night.

Cold smoke for 5-6 hours. The pastrami is on the rack. Check my other posts regarding the Canadian bacon and duck breasts.


Out of the smoker. It's in the back.


Into a pan on a rack with some water.  Bring to a simmer, cover and pop in the oven (275F) to steam-bake for  2-3 hours until fork tender


I have to test it! This is right out of the oven, and the picture is poor quality but you can see the signature color, bright pink. As with the Canadian bacon, the end pieces are quite salty, but good.


The next morning I sliced up the point for packaging and freezing. Looks good doesn't it?


Only thing left to do now is to make that sandwich for lunch! Homemade bread, mustard and pastrami. A cold beer and it doesn't get much better than this!


Until next time, Eat Well & Keep Digging!


The Gastronomic Gardener
Garden blog http://amidwestgarden.blogspot.com/
Cooking blog http://ihopeyouarehungry.blogspot.com/
Twitter - www.twitter.com/DavidPOffutt
http://www.facebook.com/TheGastronomicGardener

Friday, December 24, 2010

Merry Christmas

Merry Christmas to all of you! May the season be filled with joy and peace for you and those you love!


The Gastronomic Gardener
Garden blog http://amidwestgarden.blogspot.com/
Cooking blog http://ihopeyouarehungry.blogspot.com/
Twitter - www.twitter.com/DavidPOffutt
http://www.facebook.com/TheGastronomicGardener

Sunday, December 19, 2010

Lentil Bulgar Stew

It's been pretty meat centric around here for a few weeks, and I am craving something lighter. It's cold outside, so not only light but warm and satisfying as well.

I love both lentils and bulgar. They are versatile and nutritious. So I put them together. This recipe is by no means set in stone. Feel free to adapt it. You could make it vegetarian by using vegetable stock or water.

Ingredients:
2 cups dried lentils
1 cup bulgar
2 carrots diced
4 cloves garlic chopped
1 small onion chopped
1 red pepper chopped
5 cups chicken stock
1 can stewed tomatoes (I used some I canned this summer)
1-2 tbs oil
2 green onions chopped for garnish
salt and pepper to taste
a dash of vinegar (optional)


Put bulgar in a bowl and add hot water to cover. Cover bowl with a plate to trap the heat.

In a large pot, add the oil over medium heat.

Add the garlic and cook, stirring often 2-3 minutes.

Add the rest of the vegetables, cook until tender (about 5 minutes)


Add the lentils, tomatoes and stock. bring to a boil, reduce heat and simmer - covered but not tightly for 30 minutes.


Add the bulgar, liquid and all.


Stir together and simmer another 20 minutes or so. Check and adjust seasonings


Plate, garnish and enjoy!


Until next time, Eat Well & Keep Digging!

Stay warm too!

The Gastronomic Gardener
Garden blog http://amidwestgarden.blogspot.com/
Cooking blog http://ihopeyouarehungry.blogspot.com/
Twitter - www.twitter.com/DavidPOffutt
http://www.facebook.com/TheGastronomicGardener
Related Posts Plugin for WordPress, Blogger...