Showing posts with label beef. Show all posts

Wednesday, April 6, 2011

Korean BBQ Sliders


I loved the Korean BBQ ribs I made a while back, the sauce is fantastic.

I also recently was reading an article about the many variations of shaved beef, a way to extend cuts of meat to many more servings.

What if I combine the two? What about sliders - little savory two-bite treats?

The grocery store had beef two for one sale.  Two bottom round roasts later, and I was ready to give it a try.

I put the beef in the freezer to firm it up. Meanwhile I whipped up another batch of the BBQ Sauce. This is going to be a stapble for me I know it, but since I haven't got it memorized, here is the recipe again.


Marinade Ingredients:
3/4 cup soy sauce
3/4 cup white sugar
3/4 teaspoon ground black pepper
3-4 cloves garlic, chopped
2-3 green onions, chopped
4-1/2 teaspoons Asian (toasted) sesame oil
3/4 teaspoon sesame seeds

Make the marinade:
Whisk together the soy sauce and sugar in a bowl until the sugar has dissolved.
Stir in the black pepper, garlic, green onions, sesame oil, and sesame seeds. Set aside

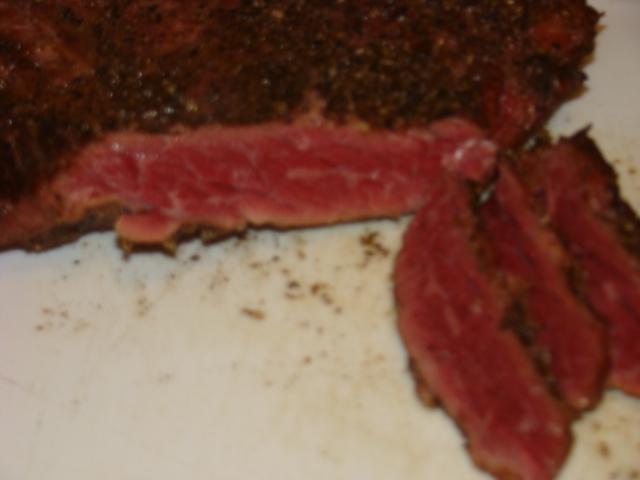
Remove the beef from the freezer, it need not be frozen solid, just very firm. Trim the fat.


Slice very thin against the grain, I used my meat slicer, it does a much better job than I could with a knife.


Marinate the beef in the BBQ sauce for minimum 2 hours or overnight.

Grill on hot outdoor grill for 2-4 minutes, it will not take long, the beef is so thin.


Mound some up on small dinner rolls, these are topped (left to right) with candied jalapenos, quick Kimchi, and grilled green onions respectively.


These are fantastic! Savory, sweet, the crunchy toppings. Definately party food!


Until next time, Eat Well & Keep Digging!


The Gastronomic Gardener
Garden blog http://amidwestgarden.blogspot.com/
Cooking blog http://ihopeyouarehungry.blogspot.com/
Twitter - www.twitter.com/DavidPOffutt
http://www.facebook.com/TheGastronomicGardener

Friday, December 31, 2010

Braised beef short ribs

I had picked up a small package of beef short ribs, intending to make Korean BBQ, but wasn't paying enough attention. They were indeed short ribs but cut incorrectly for the BBQ recipe.  You can even see from the picture I was preparing to document the recipe which calls for a dusting of sugar before marinating.


So what to do with a thick tough cut of meat? Braise it of course. Seems like in winter it is perfect to have a rich meat simmering on the stove for hours, perfuming the house.

Ingredients:
2 lbs short ribs cut between the ribs
2 tbs  seasoned flour
2 tbs oil
4 cups beef stock
1 cup red wine (optional)
1  large onion peeled and sliced
1 cup chopped carrots
1 stalk celery chopped
2 cloves garlic peeled and lightly crushed
1 sprig rosemary
Green onion for garnish
Salt and pepper to taste

Directions:
Dredge rib sections in seasoned flour
Add oil to heavy pan or dutch oven over medium heat
Brown the meat on all sides, remove from pan,
Add vegetables and cook stirring often about 5 minutes.
Increase heat to high and add 1 cup of stock,
Bring to a boil, stirring up any brown bits that have stuck to the bottom of the pan.
Add remaining stock and wine, bring to a boil
Return browned meat and any juices back into pan.
Add herbs
Reduce heat and cover.
Simmer for 3-5 hours until meat is very tender.
Check and adjust seasonings.
Serve over potatoes, polenta, or noodles.

You could strain and thicken the sauce at the last moment but I wanted to leave it thinner.


Until next time, Eat Well & Keep Digging!


The Gastronomic Gardener
Garden blog http://amidwestgarden.blogspot.com/
Cooking blog http://ihopeyouarehungry.blogspot.com/
Twitter - www.twitter.com/DavidPOffutt
http://www.facebook.com/TheGastronomicGardener

Wednesday, December 29, 2010

Pastrami step by step

I am hopping around in the Charcuterie book, having done bacon and  now setting off on a Pastrami adventure. I am picking these recipes to get started as they are seem easy and I like the end product.

Thin sliced Pastrami on rye, with dark mustard. Sounds delicious!

Pastrami is a close cousin to corned beef, the main difference is once it is cured, it is heavily seasoned then smoked prior to steaming, while corned beef is often boiled. But the beginning steps are the same.

Brisket is the preferred cut. From what I've read the point is preferred for corned beef and the flat for the pastrami but perhaps I got that backwards. In any event I trimmed the brisket into two cuts removing almost 2 lbs of fat.

Here is the cut I brought home.


And after broken down to two cuts.


Now the cure. If you're following along, the bacon was a dry rub and the porkbelly gave up it's liquid to form a brine. It also took an excruciating week of waiting. This time we'll make a brine and the curing will be down to 4 days.

For the brine (page 91 of Charcuterie):
1 gallon water
1 1/2 cups kosher salt
1 cup sugar
1 1/2 oz pink salt
1 Tbs pickling spices
1/2 cup packed brown sugar
1/4 cup honey
5 garlic cloves minced

Combine all brine ingredients in a big pot,


bring to a simmer, stir until salt and sugar disolve.


Remove from heat, allow to cool to room temp then refrigerate until chilled.

Add the beef to your container, pour brine over the top to completely cover, use a plate to weigh it down.

Now into the fridge for 3-4 days (I'll do 4 so I can smoke on Sunday at it looks like a good day weather-wise).


We'll be back soon to continue the process.

A week later, we remove the meat from the brine rinse it off.


A rub is prepared with:

1 Tbs each lightly toasted black pepper corns and whole coriander


Toast the seeds in a pan over medium heat, swirling until fragrant. Grind in a grinder.

Cover the meat with the ground spices and  refrigerate over night.

Cold smoke for 5-6 hours. The pastrami is on the rack. Check my other posts regarding the Canadian bacon and duck breasts.


Out of the smoker. It's in the back.


Into a pan on a rack with some water.  Bring to a simmer, cover and pop in the oven (275F) to steam-bake for  2-3 hours until fork tender


I have to test it! This is right out of the oven, and the picture is poor quality but you can see the signature color, bright pink. As with the Canadian bacon, the end pieces are quite salty, but good.


The next morning I sliced up the point for packaging and freezing. Looks good doesn't it?


Only thing left to do now is to make that sandwich for lunch! Homemade bread, mustard and pastrami. A cold beer and it doesn't get much better than this!


Until next time, Eat Well & Keep Digging!


The Gastronomic Gardener
Garden blog http://amidwestgarden.blogspot.com/
Cooking blog http://ihopeyouarehungry.blogspot.com/
Twitter - www.twitter.com/DavidPOffutt
http://www.facebook.com/TheGastronomicGardener

Saturday, December 18, 2010

Cold smoked sausages

With the smoke shack built and tested it is time to do a little more. I have a chunk of cured pork belly, and the ingredients for bratwurst and kielbasa. I'm using recipes from Bruce Aidells' Complete Sausage Book.

Here are the two plates of spices measured out, one for each type of wurst. For the kielbasa:

and the bratwurst.


The mixes are similar with the kielbasa calling for much  more garlic, and the bratwurst needing mace and ground mustard seed. Since they are both going into the smoker, I used the salt I smoked in the test run for extra smokey flavor

The pink is the curing salt. 6.25% sodium nitrite. It is required because the sausages will be air dried and cold smoked and it inhibits bacteria growth, particularly that responsible for botulism (Clostridium botulinum). In very high doses it is toxic, so it is dyed pink to prevent mistaking it for sugar or salt. If you're interested, we can discuss nitrites and nitrates further.

The basic sausage making is described in this old post. The process is the same here.

Cut up the meat,


Spice and grind,  chill and stuff into casings. It sounds so easy, but it took about 4 hours as I clean and disinfect all equipment between grinding and stuffing. And this of course was two batches. In the end we have 4 big kielbasas.


Before they go into the smoker, the instructions indicate to hang the sausages in front of a fan overnight.


Ready for the smoker, also have the cured and pepper pork belly.


Into the smoker.


Smoke for 12 hours. It was very cold so I did use a small propane heater to keep the smoke box above freezing. I also switched from wood chips, to chunks, they burned longer.


 All ready to poach and eat and enjoy! 

Until next tinme Eat Well & Keep Digging!


The Gastronomic Gardener
Garden blog http://amidwestgarden.blogspot.com/
Cooking blog http://ihopeyouarehungry.blogspot.com/
Twitter - www.twitter.com/DavidPOffutt
http://www.facebook.com/TheGastronomicGardener

Monday, December 6, 2010

Spaghetti Bolognese

A cold winter morning yesterday, I was in the mood for some long simmering goodness on the stove. Checking my supplies and I decided on my take of a Bolognese sauce.  It may not be perfectly authentic but it was darn good!

I have some pork shoulder bones with plenty of meat from sausage making this summer, vegetables- celery, carrots, garlic, onion, home canned tomatoes,  also (not pictured) ground beef, a pinch of nutmeg, a little beef stock, and milk.


A little olive oil in a pot over medium high heat, season the pork bones with generous salt and pepper, and put in the pot to brown.


While pork browns, dice the vegetables. When the pork is browned, remove from pot and add vegetables.


Cook the vegetables until soft but not browned. Add the pork bones back to the pot. Add a cup of stock, 1 pint of tomato sauce, 1 pint of canned whole tomatoes. Bring to a boil, reduce heat cover loosely and simmer for 3 hours. Go take a nap or do a chore, the stock will perfume the house nicely.


Remove pork bones, remove meat, discarding any fat or gristle. 


Run everything through the food mill with the biggest aperture disk. Conversely, you could have run all the vegetables through the food processor to begin with, but I like using my chef knife.


Return everything back to pot. Brown 1 lb of ground beef in pan. Drain and add to big pot.


You can see how the liquid has diminished.


Simmer slowly for another 3 hours, stirring occasionally.  Add a pinch of nutmeg and 1 cup of milk. Stir to incorporate. It has concentrated a great deal.

Prepare the pasta.


Toss pasta with some of the sauce. Plate and add a little more sauce, add some parmesan. Savor...


A long time in the making but rich and deeply satisfying.

Until next time, Eat Well & Keep Digging!


The Gastronomic Gardener
Garden blog http://amidwestgarden.blogspot.com/
Cooking blog http://ihopeyouarehungry.blogspot.com/
Twitter - www.twitter.com/DavidPOffutt
http://www.facebook.com/TheGastronomicGardener

Sunday, November 28, 2010

Red Wine Braised Beef Shanks

I had a couple beef shanks in the freezer that I took out to thaw yesterday.  Shanks need a long slow cooking and this is a perfect technique.

Ingredients:


1.5 to 3 lbs beef shank
1 large onion, halved and sliced
4 cloves garlic, peeled and lightly smashed
1 tbsp Herbs de Provence
1/2 cup Red Wine
Beef Stock, to cover
Olive Oil, for searing
Salt and pepper to taste


Yes, I used a very nice wine but it will go great with dinner!


Directions:

Place a large dutch oven or stock-pot with a tight fitting lid over medium high heat.
Season both sides of beef generously with salt and pepper.
Add 2 tbsp. olive oil to pot and swirl to coat.
Place Beef shank in pan and cook for 2-4 minutes per side, or until a deep, rich crust is formed.


Add onions, garlic and herbs.


Pour wine over shank and shake pan vigorously.

Add stock until beef is barely visible.


Press vegetables down into the liquid.
Reduce heat to low, cover and simmer for 4 to 5 hours, or until beef is fork-tender.


Test for seasoning and simmer an additional 20 minutes. At this point I removed them and put them in a warm oven wrapped in foil.

While the shanks were cooking I made the white beans. I make them sort of like risotto, a slow simmer slowly adding broth - in this case beef broth.

In a pan over medium high heat, add some garlic.


Add 1  diced carrot, 2 diced celery stalks and a little broth, cook until vegetables are tender. 


Add beans, and some broth.


When beans are tender, mash them coarsely, and add a little more broth.


Simmer the beans on low heat to drive some of the moisture out.  

Meanwhile, strain the broth, return liquid to the pot, increase the heat to high, add a tablespoon of butter and bring to a boil.


Add a little slurry of cornstarch and water. Add to the broth, and wisk until brot thickens into a gravy.


Remove shanks from oven.


Plate some bean puree, a shank, and spoon some of the gravy over the top. I must say, it was fantastic! Rich gravy, melt in your mouth beef, and hearty beans. Make this soon!


Until next time, Eat Well & Keep Digging!


The Gastronomic Gardener
Garden blog http://amidwestgarden.blogspot.com/
Cooking blog http://ihopeyouarehungry.blogspot.com/
Twitter - www.twitter.com/DavidPOffutt
Related Posts Plugin for WordPress, Blogger...