Monday, June 27, 2011

Meatless Monday - Garlic-Ginger Brassica Stirfry

OK, for many of you this might seem like cheating, after all, a stir fry is about as basic as it gets. If this is the case, skip this post and tune in next time.

Still with me?

When I was at the Korean market the other day the bok choy and Japanese broccoli looked good so I got some of each, put them in the crisper and forgot about them.  I found them tonight and in order to use them up I decided a simple stir fry would be in order. Be certain to rinse the bok choy well, it tends to be a bit gritty - and please don't run the rinse water down the drain, save it to water the garden.

If I had to name a single method of cooking in order to have tasty meals in minutes, one that is versatile for vegetables and meat, poultry or seafood; stir fry would be my choice. A little knife prep, a hot wok, a splash of oil and you are good to go. Cooking this way, if done properly - leads to beautiful, colorful plates of food.

Tonight I had the before mentioned bok choy, Japanese broccoli, onions from the garden, a bit of bell pepper, garlic and ginger and garlic chili paste.


Start some rice. After about 15 minutes, put a wok over high heat. Heat for several minutes until wok is very hot.

Add about 2 Tbs oil - peanut or canola - NOT olive oil.


Add garlic and ginger - Stir fry - with metal utensil about 30 seconds,

Add the onions and peppers stir fry another 30 seconds, At this point I remembered I had some julienned vegetables from the Smoked Duck Spring rolls, so I threw them in as well.

Add the bok choy and  broccoli, stir fry - keeping the vegetables moving in the hot wok until they turn bright green and just start to wilt. Add a good pinch of salt.

Add the chili paste


Toss to coat. I added a couple tablespoons of corn starch slurry to tighten up the liquids.


Toss one last time, remove from the heat. Plate with a little rice, a few cilantro sprigs make a nice garnish.


This is an easy - no fuss, yet deeply satisfying dinner. Whip up a stir fry this week!

The Gastronomic Gardener
Garden blog http://amidwestgarden.blogspot.com/
Cooking blog http://ihopeyouarehungry.blogspot.com/
Twitter - www.twitter.com/DavidPOffutt
http://www.facebook.com/TheGastronomicGardener

Thursday, June 23, 2011

Smoked Duck Spring Rolls

Welcome to the blog Sarah!

I've had a taste for some smoked duck since I first smoked some chickens in my new smoker. I've been delayed by several severe storms but last night I finally got my smoke on.


With it being summer and all, smoked duck might seem a little heavy, but if we use it as an accent we can have a delicious light dinner. What could be lighter than fresh spring rolls?

Ingredients:
2 smoked chicken breast julienned
Carrot, cabbage, radish,green onion all julienned (The radish, onion and basil are from the garden. This makes me very happy.)
basil leaves
spring roll skins (available in the Asian aisle)


Directions:
Fill a bowl with warm water.

Dampen a tea towel and place on a flat surface.

Place a spring roll skin in the bowl warm water. It'll soften in less than a minute.


Remove skin carefully from bath, and lay flat on damp towel. Flip over to blot other side then lay flat on work surface. From here on out it's pretty much like making a burrito. The folding method is the same.

Place filling in lower third of wrapper.


Fold over the bottom then fold the two sides in.


Roll it up.


Repeat ten times. I should have taken pictures of the last one not the first. I definitely got better as I went along. Served with some chili dipping sauce. (Shoulda cut it on a bias but I was tired and hungry.)


Click on the picture for all it's glory.


Crunchy, savory, light with a little bite of sweet heat from the sauce. A nice appetizer, or have five and make it dinner!


Until next time, Eat Well & Keep Digging!

The Gastronomic Gardener
Garden blog http://amidwestgarden.blogspot.com/
Cooking blog http://ihopeyouarehungry.blogspot.com/
Twitter - www.twitter.com/DavidPOffutt
http://www.facebook.com/TheGastronomicGardener

Wednesday, June 15, 2011

Not your Grandma's Shrimp and Grits


I had some left over polenta from the other day that I had poured into a pan. One thing I like about polenta is how it sets up, making a wonderful item for sauteeing to a crispy crust and then adding whatever suits your fancy.

I've had a taste  for shrimp and thought... hmmm shrimp n grits. But let's tart them up a bit shall we? As in most of the things I make, nothing difficult here, but the outcome is delicious! Here's how I did it.

Ingredients:
6 huge shrimp - (6-8 count)
2 "pucks" of polenta - you could cut whatever shape you want
6 slices of bacon chopped into little pieces
2 Tbs chopped parsley
2 green onions chopped
1 clove garlic minced fine
Juice of 1 lime
1-2 Tbs olive oil
Salt and pepper to taste


Directions:
Preheat oven to low

Over medium- high heat, add the olive oil to a pan

Season the polenta pucks and shrimp with salt and pepper

Add polenta to pan and brown on both sides.


Remove polenta to oven safe dish, put in the warm oven.

Wipe out the pan and add the bacon. Cook until fat renders and bacon is getting crispy.


Remove bacon to paper towel lined plate with a slotted spoon or spatula.

Add the shrimp to pan and cook until just cooked through and pink, about 2 minutes per side.

Do Not Over Cook!


Add the onion, garlic, parsley and lime juice. Toss to coat and remove from heat.


I plated it up, puck on the bottom, three fat and succulent shrimp, some of the sauce and garnish with bacon bits.


Creamy polenta with a little crunch, tender shrimp, the lime adding just the right amount of acid and tang, and the smoky bacon. No it's not your grandma's shrimp and grits, and yes, it's a tad fussy presentation, but it was damn good! Put it on your menu soon!

Until next time Eat Well and Keep Digging!

The Gastronomic Gardener
Garden blog http://amidwestgarden.blogspot.com/
Cooking blog http://ihopeyouarehungry.blogspot.com/
Twitter - www.twitter.com/DavidPOffutt
http://www.facebook.com/TheGastronomicGardener

Monday, June 13, 2011

Meatless Monday - Tomato Eggplant Ragu over Polenta with Roasted Red Pepper Coulis

It's been a few weeks since I've posted a Meatless Monday dish. So hopefully I can make up for it with this simple yet elegant  dish.

Last summer I put up some Tomato Eggplant Relish. While it is good on toasted slices of baguette, it is outstanding warmed up over pasta.  For tonight I'm going to switch it up and instead of pasta, I'll make a creamy cheese polenta, and top it off with a drizzle of pureed roasted red peppers! If you don't have any relish, a saute of summer vegetables and a bit of tomato sauce would work just fine as well. Zucchini, eggplant, peppers all would be great. Feel free to mix it up!

Ingredients:
Tomato Eggplant Relish
1 cup Tomato Sauce - from the garden last year


For the Polenta:
1 1/2 cups polenta or yellow cornmeal
1 cup heavy cream
2 cups milk
water as needed
1 1/2 tablespoons unsalted butter
1/4 cup freshly grated Parmigiano-Reggiano
Kosher salt and freshly ground black pepper


For Roasted Red Pepper Coulis:
1.5 cups roasted red peppers - If using canned - rinse the off and pat  dry


Directions:
In a large pot add milk and cream bring the milk and cream mixture up to a simmer and gradually pour in the cornmeal in a slow, steady stream, whisking constantly.


Once the milk is completely absorbed, lower the heat and set a timer for 20 minutes.

Continue cooking, whisking often, until the timer goes off, add water if the mixture is too thick (it should be similar creamy mashed potatoes). I ended up adding almost 1.5 cups of water during the cooking time.


When the timer goes off the polenta should be thick and smooth. Finish with butter, grated cheese, salt and pepper.

While the polenta was cooking, I added the Eggplant and tomato sauce to a pan, and heated gently.


In the midst of all this I pureed the roasted red pepper using the immersion blender - a regular blender would work just fine too.


To serve, add a portion of polenta, top with the eggplant tomato mixture, and drizzle on the red pepper puree.


The polenta is stick-to-your ribs filling, rich and cheesey, and serve as a nice counter point to the acid tomatoes. This dinner can be on the table in under 40 minutes which makes it a delicious weeknight meal,

Until next time, Eat Well & Keep Digging!

The Gastronomic Gardener
Garden blog http://amidwestgarden.blogspot.com/
Cooking blog http://ihopeyouarehungry.blogspot.com/
Twitter - www.twitter.com/DavidPOffutt
http://www.facebook.com/TheGastronomicGardener

Sunday, June 12, 2011

Pork Belly Confit - Tacos

It's been a while since I made bacon, but I've also been dreaming about Pork Belly Confit. This recipe (Jim Drohman's Pork Belly Confit) comes from the book Charcuterie by Michael Ruhlman and Brian Polcyn. I purchased this book and have been working through and around it. It is the basis of Charcutepalooza, which I have been involved in.

Pork belly confit..... hmmm porkbelly, cured then poached in pork fat until tender.
This will keep for months in the fridge (how long do you really think it will last?), then fry some up and make fatty, crispy, succulent Taco's. I think I might pass out!


Since I am only using 3 lbs of pork belly I've cut the recipe in half.

Ingredients:
1 Tbs freshly ground black pepper
1/4 tsp ground cinnamon
1/4 tsp ground cloves
1/8 tsp ground allspice
1.5 bay leaves crumbled
5 sprigs fresh thyme
1 oz kosher salt (about 2 Tbs)
1/2 tsp pink salt


3lbs pork belly, skin removed, cut into 1" x 3" chunks


Dry white wine as needed.
Rendered pork fat as needed (I got mine from the Carniceria nearby)
Canola oil or rendered fat for deep frying

Mix the cure ingredients together
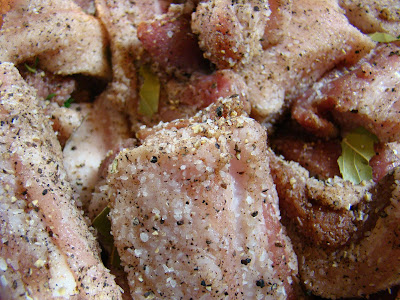
Toss the pork chunks and the cure ingredinents in a big bowl to coat evenly.


Pack coated pork into a non-reactive container.


Cover with white wine.


This goes into the fridge for 24-36 hours.

Preheat oven to 250F

Remove the pork from the cure and pat the pieces dry with paper towels.


Place pork in an ovenproof pot or Dutch oven and cover with the rendered fat.  And this is where the wheels came off - sorta. The fat that I had purchased had a lot of particulate matter in it and was nuttty brown.


So I tried to filter it out - a little heat, some coffee filters and, well.... I did get a bit of the sediment out but I did not like the way it tasted.


I made an executive decision and went for the lard. It is pork fat, and it's produced by a huge faceless corporation, and I feel a little guilty. I'll get over it. I just don't want to mess up the confit.


Bring to a simmer on the stovetop.


Then place in the oven, uncovered, and cook until the pork is fork-tender, about 2 to 3 hours.

Remove the pork from the oven and cool to room temperature in the fat.

Refrigerate the pork in the pan it was cooked in or transfer to another container and add the fat; the pork should be completely submerged in the fat. Refrigerate until completely chilled, or for up to 2 months.

To serve, remove the pork from the refrigerator, preferably a few hours ahead. Remove the pork from the fat, and wipe off the excess.  It doesn't look like much but stay with me...


In a deep-heavy pot, heat the oil for deep-frying 350 to 375. Deep-fry the pork belly until crispy and heated through, about 2 minutes if it was at room temperature.


Remove and drain on paper towels. Add a dash of coarse salt.


I made tacos - simple with cilantro, onion and a squeeze of lime. Hot, salty, crunchy outside; fatty, rich, meltingly tender inside. Sublime.


Not something to have every day, but once in a while? You have to live right? This was not difficult to do, and the rewards are simple yet spectacular!


Until next time, Eat Well & Keep Digging!

The Gastronomic Gardener
Garden blog http://amidwestgarden.blogspot.com/
Cooking blog http://ihopeyouarehungry.blogspot.com/
Twitter - www.twitter.com/DavidPOffutt
http://www.facebook.com/TheGastronomicGardener

Sunday, June 5, 2011

Bean Salad - aka Cowboy Caviar

Summer - the season of cold foods and salads! In the heat of summer, we need the refreshing coolness of fruits and vegetables. Oh, you know I like the grill and the smoker, but I also love the cool foods of summer.


My family's favorite has to be one of the simplest summer salads you can make, a bean salad. It is very flexible, is open to almost any interpretation, and can be a meal unto itself.  You could cook all the beans from scratch but why? Unless you have some put up from last year, store bought canned will work just fine though I suspect home canned would be that much better!

Ingredients:
15.5 oz can drained and rinsed Red Kidney beans
15.5 oz can drained and rinsed Garbanzo beans (also known as Ceci or chickpeas)
15.5 oz can drained and rinsed Black Beans
15.5 oz can  drained and rinsed White beans
11 oz can drained Corn with chili's
Red onion diced
Celery Diced
Sweet pickle chips - chopped
1 handful minced Cilantro (or to taste (optional))
Salt to taste
1/4 - 1/2 cup Italian salad dressing - or make your own oil and vinegar based dressing


Dice the celery and onion. Put into a large bowl. Add chopped sweet pickles.


Open and drain rinse all the beans. Just drain the corn, no need to rinse it. Add to bowl.


Add the minced cilantro and gently fold to combine.  Add the dressing and combine again.


You may serve immediately or chill it before serving.  It will keep 3-4 days. This is great picnic / BBQ fare. Feel free to add minced garlic, hominy, chopped sweet peppers, diced cucumber or ....?

Until next time, Eat Well & Keep Digging!

The Gastronomic Gardener
Garden blog http://amidwestgarden.blogspot.com/
Cooking blog http://ihopeyouarehungry.blogspot.com/
Twitter - www.twitter.com/DavidPOffutt
http://www.facebook.com/TheGastronomicGardener
Related Posts Plugin for WordPress, Blogger...